Categories
Pressure Washing Blog

What Is Soft Washing? Everything Vancouver Homeowners Need to Know

What Is Soft Washing?

Soft washing is a cleaning method that uses low-pressure water (typically under 500 PSI) combined with specialized biodegradable cleaning solutions to safely remove dirt, algae, moss, mildew, and bacteria from exterior surfaces. Unlike traditional pressure washing, which relies on high-pressure water to blast away grime, soft washing uses chemistry rather than force to achieve a thorough clean.

Updated for 2026 with the latest best practices, pricing insights, and expert tips for Vancouver-area homeowners.

At Shine City Pressure Washing, soft washing is our go-to method for most residential exterior cleaning in Vancouver, Surrey, and the Lower Mainland. It delivers superior results while protecting your home’s surfaces from damage.

Soft Washing vs Pressure Washing: What’s the Difference?

Understanding the difference between soft washing and pressure washing is important for protecting your property:

Pressure Washing

  • Pressure: 2,000-4,000+ PSI
  • Method: High-pressure water stream blasts away dirt and debris
  • Best for: Hard surfaces — concrete, brick, stone, asphalt
  • Risk: Can damage soft surfaces, force water behind siding, strip paint, gouge wood

Soft Washing

  • Pressure: Under 500 PSI (similar to a garden hose)
  • Method: Cleaning solution does the work; low pressure just rinses it away
  • Best for: Siding (vinyl, Hardie board, stucco, wood), roofs, decks, fences, painted surfaces
  • Risk: Minimal — the low pressure cannot damage surfaces when applied correctly

Think of it this way: pressure washing is like scrubbing a stain with steel wool, while soft washing is like soaking it in cleaner and wiping it away. Both get the job done, but one is much gentler on the surface.

When Should You Use Soft Washing?

Soft washing is the recommended method for any surface that could be damaged by high pressure. In Vancouver, this includes most residential applications:

Vinyl and Hardie Board Siding

High-pressure washing can force water behind siding panels, causing moisture damage, mold growth inside walls, and even electrical hazards. Soft washing your house safely removes years of dirt, algae, and mildew without any risk of water intrusion.
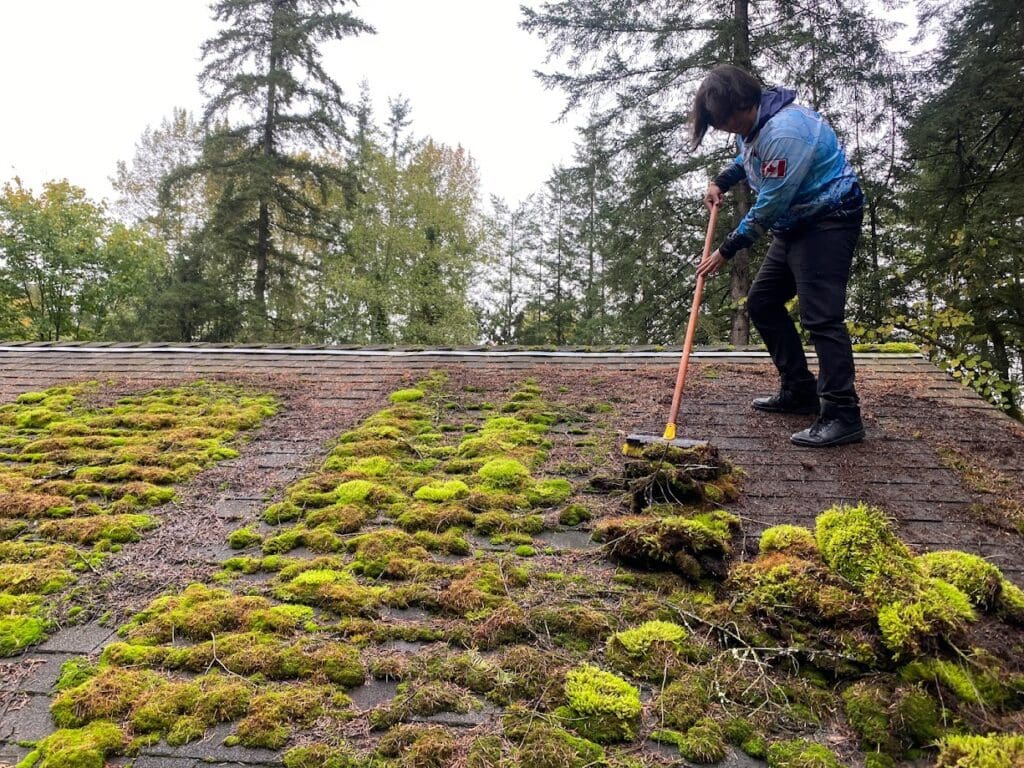
Roof Cleaning

Roof cleaning should always use soft wash methods. High pressure strips the protective granules from asphalt shingles, dramatically shortening their lifespan. Soft washing kills moss and algae at the root level, and the treatment continues working for weeks after application.

Cedar and Wood Surfaces

Cedar siding, cedar decks, and wood fences are soft and porous. Pressure washing tears the wood fibres, creating a rough, damaged surface. Soft washing cleans gently while preserving the wood grain and natural beauty.

Stucco Exteriors

Stucco cleaning requires soft wash techniques because high pressure can chip, crack, or dislodge stucco finish. Soft washing removes organic growth without compromising the stucco surface.

Painted Surfaces

Pressure washing can strip paint, especially on older homes where paint may already be peeling. Soft washing cleans painted surfaces without removing or damaging the paint.

How Does Soft Washing Work?

The soft washing process at Shine City follows these steps:

  1. Assessment — We inspect the surface to identify the type of growth (moss, algae, mildew) and choose the appropriate cleaning solution.
  2. Pre-treatment — We apply a biodegradable cleaning solution to the surface. The solution breaks down organic matter and kills mold, mildew, and algae at a cellular level.
  3. Dwell time — The solution is left to work for 10-20 minutes, depending on the severity of buildup. This is where the cleaning actually happens.
  4. Rinse — We gently rinse the surface with low-pressure water, washing away the dissolved grime and cleaning solution. The surface is left clean and undamaged.
  5. Post-treatment — For roofs and heavily affected areas, we may apply a preventive treatment that inhibits regrowth for 1-2 years.

The Science Behind Soft Wash Solutions

Professional soft washing solutions are more than just soap and water. The cleaning agents used by Shine City contain a carefully calibrated blend of surfactants, algaecides, and sanitizers that work together to eliminate organic growth at the molecular level. Surfactants break the surface tension of water, allowing the solution to penetrate deep into porous surfaces where moss and algae roots are embedded. The algaecide component disrupts the cell walls of living organisms, killing them from the inside out rather than simply removing them from the surface.

This is the fundamental difference between soft washing and pressure washing: pressure washing removes what you can see, while soft washing kills what you cannot see. The spores and root systems that remain after pressure washing will regrow within weeks or months. After a proper soft wash treatment, regrowth is inhibited for one to three years because the organisms have been eliminated at the source.

Common Soft Washing Mistakes to Avoid

While soft washing is safer than pressure washing, there are still mistakes that can lead to poor results or surface damage. Here are the most common errors homeowners and inexperienced contractors make:

  • Using too strong a solution — Over-concentrated cleaning agents can discolour certain siding materials and harm landscaping. Professional technicians test dilution ratios for each surface type.
  • Insufficient dwell time — Rinsing too quickly means the solution has not had time to break down organic growth. Patience during the dwell phase is critical for a thorough clean.
  • Skipping the pre-rinse — Wetting plants, landscaping, and surrounding surfaces before applying solution protects them from chemical contact. Skipping this step risks browning or burning nearby vegetation.
  • Washing in direct sun — Hot, sun-exposed surfaces cause the cleaning solution to evaporate before it can work. Overcast days or shaded surfaces produce the best results.
  • Using the wrong nozzle — Even at low PSI, a zero-degree nozzle concentrates water into a cutting stream. Soft washing requires wide-angle fan tips that distribute water evenly across the surface.

Is Soft Washing Safe for Plants and Pets?

The cleaning solutions we use at Shine City are biodegradable and eco-friendly. They break down into harmless components (water, oxygen, and salt) within minutes of being rinsed. We take additional precautions:

  • Pre-wetting plants and gardens before and after treatment
  • Using plant-safe concentrations near landscaping
  • Rinsing all surrounding areas thoroughly
  • Keeping pets indoors during the cleaning process

After the rinse is complete and surfaces have dried (typically 30-60 minutes), the area is completely safe for children, pets, and plants.

How Much Does Soft Washing Cost in Vancouver?

Soft washing pricing is similar to or slightly higher than traditional pressure washing because of the specialized cleaning solutions used:

The slightly higher cost is offset by better results and longer-lasting cleanliness — soft wash treatments inhibit regrowth, so you won’t need to clean as frequently.

Soft Washing for Different Vancouver Neighbourhoods

Vancouver’s diverse geography means different neighbourhoods face different exterior cleaning challenges. Homes in North Vancouver and the North Shore sit under heavy tree canopy with significant shade, making them especially prone to moss and algae on siding and roofs. Soft washing is essential here because the organic growth is often deeply embedded after years of damp, shaded conditions.

Properties in East Vancouver and Burnaby tend to have older homes with original wood siding, painted finishes, and heritage features that cannot withstand high-pressure cleaning. Soft washing preserves these delicate surfaces while removing decades of accumulated grime. In South Surrey and White Rock, coastal proximity adds salt spray to the mix, which combines with biological growth to create stubborn deposits that only chemical cleaning can fully address.

Why Soft Washing Is Especially Important in Vancouver

Vancouver’s wet, mild climate creates perfect growing conditions for moss, algae, and mildew. These organisms thrive in our 1,100+ mm of annual rainfall and mild year-round temperatures. Unlike drier climates where surfaces mainly collect dust and dirt, Vancouver homes battle biological growth — and soft washing is specifically designed to kill and prevent biological growth.

Pressure washing alone only removes the surface layer of moss and algae. Soft washing kills the roots and spores, providing much longer-lasting results. That’s why professional exterior cleaning companies in the Lower Mainland increasingly use soft wash as their primary method.

How Often Should You Soft Wash Your Home in Vancouver?

The frequency of soft washing depends on your property’s exposure and surrounding environment. As a general guideline for Metro Vancouver homeowners:

  • Siding and house exterior: Every 1-2 years. Homes under heavy tree cover or on north-facing slopes may benefit from annual soft washing.
  • Roof: Every 2-3 years. Apply preventive treatment after each cleaning to extend the interval.
  • Decks and fences: Every 1-2 years, or as needed based on visible moss and discolouration.
  • Driveways and patios: These hard surfaces are better suited to pressure washing, but soft wash pre-treatment can be applied to inhibit future biological growth.

Regular soft washing is significantly cheaper than waiting until heavy buildup requires extensive cleaning. Maintenance washes take less time, use fewer products, and keep your home looking its best year-round.

Frequently Asked Questions About Soft Washing

How long do soft washing results last?

Soft washing results typically last 1-3 years depending on the surface and environmental conditions. Roofs in shaded areas may need re-treatment sooner, while south-facing walls with good sun exposure can stay clean for 2-3 years. The preventive treatment we apply inhibits regrowth significantly longer than pressure washing alone.

Can I soft wash my house myself?

While DIY soft washing is possible with the right equipment and solutions, we recommend professional service for several reasons: the cleaning solutions require proper dilution and handling, working at heights is dangerous, and incorrect application can leave streaks or damage plants. Professional soft washing is affordable and ensures a thorough, safe result.

Does soft washing work in the rain?

Yes! Light rain doesn’t affect soft washing effectiveness since we’re already applying water. The cleaning solution adheres to surfaces even in wet conditions. However, heavy downpours can dilute the solution before it has adequate dwell time, so we may reschedule in severe weather.

Is soft washing the same as power washing?

No. Power washing and pressure washing both use high-pressure water (2,000+ PSI), while soft washing uses low pressure (under 500 PSI) with cleaning solutions. The terms “power washing” and “pressure washing” are often used interchangeably, but soft washing is a distinctly different and gentler technique.

What surfaces should NOT be soft washed?

Almost all surfaces benefit from soft washing. The only exception might be bare, unsealed concrete or very dirty brick where high-pressure washing is actually more effective. For flat concrete surfaces like driveways and patios, we typically use pressure washing — see our pressure washing pricing.

Does soft washing remove oil stains or rust?

Soft washing is designed primarily for biological growth such as moss, algae, mildew, and bacteria. Oil stains on driveways and rust stains on concrete require different treatment methods, often involving specialized degreasers or oxalic acid solutions applied with pressure washing equipment. If you have a mix of biological growth and stains, we can combine both techniques during a single visit.

Protect your home with the right cleaning method. Get your free soft washing estimate from Shine City Pressure Washing — Vancouver’s trusted exterior cleaning professionals with 290+ five-star Google reviews. Call us at (604) 229-5354 or request a quote online.

Categories
Pressure Washing Blog

Eavestrough Cleaning in Surrey: Why It Matters & What It Costs

What Is Eavestrough Cleaning and Why Does It Matter?

Eavestroughs (also called gutters or rain gutters) are the channels along the edge of your roof that collect and redirect rainwater away from your home’s foundation. In Surrey’s rainy climate, properly functioning eavestroughs are critical — they prevent water damage, basement flooding, fascia rot, and foundation erosion.

Updated for 2026 with the latest best practices, pricing insights, and expert tips for Vancouver-area homeowners.

Eavestrough cleaning involves removing leaves, pine needles, moss, shingle grit, and other debris that accumulates and blocks the flow of water. At Shine City Pressure Washing, eavestrough cleaning is one of our most requested services across Surrey, Vancouver, Burnaby, and the Lower Mainland.

How Much Does Eavestrough Cleaning Cost in Surrey?

Eavestrough cleaning in Surrey typically costs between $100 and $300 depending on the size of your home and the condition of your eavestroughs:

  • Single-storey home: $100-$175
  • Two-storey home: $150-$225
  • Three-storey or complex roofline: $200-$300+

Our service includes complete debris removal from all eavestroughs, downspout flushing to ensure proper drainage, and a flow test to verify everything is working. We also inspect for damage, sagging, or loose hangers and let you know if any repairs are needed.

How Often Should You Clean Your Eavestroughs in Surrey?

In Surrey and the Lower Mainland, we recommend eavestrough cleaning at least twice per year:

  • Late fall (November) — After leaves have dropped from deciduous trees. This is the most critical cleaning because leaf buildup before the heavy rain season causes the worst blockages.
  • Spring (March-April) — To clear winter debris, pine needles, and moss that accumulated over the wet months.

Properties with large trees (especially maples, oaks, or conifers) directly overhead may need 3-4 cleanings per year to keep eavestroughs flowing freely.

What Happens If You Don’t Clean Your Eavestroughs?

Neglecting eavestrough cleaning in BC’s wet climate can cause serious and expensive damage:

  • Water overflow — Clogged eavestroughs overflow during rain, sending water cascading down your siding, staining walls, and pooling near your foundation.
  • Foundation damage — Water pooling against your foundation can cause cracks, leaks, and in severe cases, structural movement. Foundation repair can cost $5,000-$20,000+.
  • Basement flooding — Overflowing eavestroughs are one of the most common causes of basement water intrusion in Surrey homes.
  • Fascia and soffit rot — Standing water in clogged eavestroughs causes the wood behind them to rot. Replacing fascia and soffits costs $1,000-$5,000.
  • Ice dams — While less common in Metro Vancouver, cold snaps can cause water trapped in clogged eavestroughs to freeze, creating ice dams that lift shingles and cause roof leaks.
  • Pest habitat — Clogged eavestroughs with standing water attract mosquitoes, wasps, and can become nesting sites for birds and rodents.

Eavestrough Cleaning vs Gutter Cleaning: What’s the Difference?

There is no difference — “eavestrough” and “gutter” refer to the same thing. “Eavestrough” is the more common term in Canada (especially in BC, Alberta, and Ontario), while “gutter” is more commonly used in the United States. When you search for eavestrough cleaning or gutter cleaning in Surrey, you’re looking for the same service.

The Eavestrough Cleaning Process

Understanding what happens during a professional eavestrough cleaning helps you appreciate why the service is worth the investment. At Shine City, our process includes several key steps that go beyond simply scooping out leaves:

  1. Full perimeter inspection — Before we begin cleaning, we walk the entire perimeter of your home to assess the condition of each section of eavestrough. We note any areas that are sagging, pulling away from the fascia, or visibly damaged.
  2. Debris removal — Using hand tools and vacuum systems, we remove all accumulated debris from the troughs. This includes leaves, pine needles, shingle granules, twigs, moss, and compacted sediment that has built up over time.
  3. Downspout flushing — Clogged downspouts are often the hidden cause of eavestrough overflow. We flush every downspout with water to verify that it drains freely from top to bottom, clearing any blockages we encounter.
  4. Underground drain check — Many Surrey homes have underground drain pipes connected to their downspouts. We check these connections to ensure water is flowing into the municipal drainage system or away from the foundation as designed.
  5. Flow test — After cleaning, we run water through the entire system to confirm that every section is draining properly and there are no slow spots or pooling areas.
  6. Condition report — We provide you with a summary of any issues we found, such as loose hangers, rusted sections, joint separations, or areas where the pitch needs adjustment.

Common Eavestrough Problems in Surrey

Surrey’s mix of suburban neighbourhoods, mature tree cover, and heavy rainfall creates specific eavestrough challenges that homeowners should be aware of:

Needle Buildup from Conifers

Surrey neighbourhoods like Fleetwood, Fraser Heights, and South Surrey are lined with Douglas fir, Western red cedar, and other conifers that shed needles year-round. Unlike leaves, which sit on top and are relatively easy to remove, pine and fir needles are small enough to slip past most gutter guards and compact into a dense mat at the bottom of your eavestroughs. This compacted needle layer is harder to clean and acts like a dam, blocking water flow even when the troughs appear only partially filled.

Moss Growth Inside Eavestroughs

The damp conditions inside eavestroughs create an ideal environment for moss to grow. In Surrey’s climate, moss can establish itself inside the troughs within a single rainy season, particularly on the north side of the home where sunlight rarely reaches. Moss-filled eavestroughs hold moisture against the metal or vinyl material, accelerating corrosion and adding weight that can cause sagging.

Shingle Granule Accumulation

As asphalt shingle roofs age, they shed granules that wash into the eavestrough system. This gritty sediment settles at the bottom of the troughs and inside downspout elbows, gradually restricting water flow. Homes with roofs older than 15 years often have significant granule buildup that requires professional cleaning to fully remove.

DIY vs Professional Eavestrough Cleaning

While some homeowners clean their own eavestroughs, there are important reasons to consider professional cleaning:

  • Safety — Climbing ladders to clean eavestroughs is one of the leading causes of home injury. Two-storey homes require extension ladders, and wet, slippery conditions in BC make falls more likely.
  • Thoroughness — Professionals flush downspouts and underground drains, catching blockages that aren’t visible from above. We also spot damage that homeowners often miss.
  • Efficiency — What takes a homeowner several hours takes our team 30-60 minutes with proper equipment.
  • Disposal — We remove all debris from your property. No mess left behind.

Eavestrough Guard Options for Surrey Homes

Many homeowners ask whether installing eavestrough guards can eliminate the need for cleaning. While guards reduce the frequency of cleaning, they do not eliminate it entirely. Here is a comparison of the most common guard types available in Surrey:

  • Mesh screens — These sit on top of the eavestrough and filter out larger debris. They are affordable ($3-$6 per linear foot installed) and effective against leaves but still allow fine debris and needles to pass through. Recommended cleaning frequency with mesh screens: once per year.
  • Reverse-curve guards — These use surface tension to direct water into the trough while debris slides off the edge. They work well in moderate conditions but can struggle with heavy rainfall and fine debris. Cost: $8-$15 per linear foot installed. Recommended cleaning: once per year.
  • Micro-mesh guards — The most effective option, featuring a fine stainless steel mesh that blocks virtually all debris while allowing water through. Cost: $15-$25 per linear foot installed. Recommended cleaning: once every 1-2 years for exterior maintenance.
  • Foam inserts — Porous foam blocks placed inside the eavestrough that allow water to filter through while blocking debris. These are the least expensive option ($2-$4 per foot) but tend to deteriorate within 2-3 years and can harbour mould growth.

Signs Your Eavestroughs Need Cleaning

Watch for these warning signs that indicate your eavestroughs need attention:

  • Water overflowing the sides during rain
  • Plants or grass growing in the eavestrough
  • Sagging or pulling away from the fascia board
  • Staining or mildew on your siding below the eavestrough
  • Water in your basement or crawl space during heavy rain
  • Birds or pests nesting in the eavestroughs

Eavestrough Cleaning for Strata & Commercial Properties

Shine City serves strata complexes, townhouse developments, and commercial buildings across Surrey and the Lower Mainland. Multi-unit eavestrough cleaning programs include scheduled seasonal visits, volume pricing, and complete documentation for strata councils. Learn about our commercial services.

Frequently Asked Questions About Eavestrough Cleaning

How long does eavestrough cleaning take?

For a standard Surrey home, professional eavestrough cleaning takes 30-60 minutes. Larger homes, multi-storey buildings, or heavily clogged systems may take 1-2 hours. We schedule enough time to do the job properly.

Can you clean eavestroughs in the rain?

Yes — in fact, rain can be helpful as it shows us exactly where blockages and drainage issues are. We work in all weather conditions except during lightning storms or dangerous wind. In Surrey, waiting for dry weather would significantly limit available work days.

Do you offer eavestrough repair?

We identify and report any damage during cleaning — loose hangers, sagging sections, leaking joints, and rust spots. Minor repairs can often be handled on the spot. For major repairs or eavestrough replacement, we can recommend trusted local contractors.

Should I get eavestrough guards installed?

Eavestrough guards (leaf screens) can reduce the frequency of cleaning needed, but they don’t eliminate it entirely. Fine debris, shingle grit, and moss still get through most guard systems. They’re worth considering if your home is under heavy tree cover, but plan on professional cleaning at least once per year even with guards installed.

Do you bundle eavestrough cleaning with other services?

Yes! Many of our Surrey customers combine eavestrough cleaning with roof cleaning, house washing, or window cleaning to save money with package pricing. Bundling typically saves 10-15% compared to booking each service separately.

What is the best month for eavestrough cleaning in Surrey?

November is the single best month for eavestrough cleaning in Surrey. By mid-November, most deciduous trees have dropped their leaves, and cleaning at this time prepares your system for the heaviest rainfall months of December through February. For your second annual cleaning, April is ideal as it clears winter accumulation before the drier summer months.

Do you offer free estimates?

Yes! Shine City provides free, no-obligation estimates for eavestrough cleaning across Surrey and the Lower Mainland. Contact us today to schedule yours.

Don’t wait for water damage — protect your home with regular eavestrough cleaning. Get your free estimate from Shine City Pressure Washing, proudly serving Surrey with 290+ five-star Google reviews. Call (604) 229-5354 or request a quote online.

Seasonal Eavestrough Maintenance Tips for Surrey Homeowners

Between professional cleanings, Surrey homeowners can take simple steps to reduce eavestrough problems. After major wind storms, visually inspect your eavestroughs from ground level for sagging or overflow signs. During dry summer months, check that downspout extensions are directing water at least four feet away from your foundation. If you notice water pooling near the base of your home during rain, it may indicate a disconnected or damaged underground drain that needs professional attention. These small actions complement professional cleaning and help catch issues before they become costly repairs.

Categories
Pressure Washing Blog

Roof Moss Removal Cost in Vancouver: Complete 2026 Guide

How Much Does Roof Moss Removal Cost in Vancouver?

Roof moss removal in Vancouver typically costs between $300 and $600 for a standard residential home. The final price depends on your roof’s size, pitch, the severity of moss growth, and the treatment method used. For large or heavily mossy roofs, costs can reach $700-$900.

Updated for 2026 with the latest best practices, pricing insights, and expert tips for Vancouver-area homeowners.

At Shine City Pressure Washing, we specialize in safe, effective roof moss removal across Vancouver, Burnaby, Surrey, and the entire Lower Mainland. We offer free estimates so you know the exact cost before any work begins.

Why Is Roof Moss So Common in Vancouver?

Vancouver receives over 1,100mm of rain annually, creating perfect conditions for moss, algae, and lichen to thrive on rooftops. North-facing roof sections and areas shaded by trees are especially susceptible. The city’s mild winters mean moss continues growing year-round, unlike in colder climates where freezing temperatures slow growth.

Left untreated, moss causes serious damage: it lifts shingle edges, traps moisture underneath, and accelerates the deterioration of your roof. Many Vancouver homeowners discover they need a premature roof replacement costing $10,000-$25,000 because moss was left unchecked for years.

Roof Moss Removal Pricing Breakdown

Here is what you can expect to pay for roof moss removal in Vancouver based on roof size:

  • Small roof (under 1,000 sq ft): $250-$350
  • Standard roof (1,000-1,500 sq ft): $300-$450
  • Large roof (1,500-2,500 sq ft): $400-$550
  • Extra large roof (2,500+ sq ft): $550-$700+

Additional Cost Factors

  • Roof pitch — Steep roofs (8/12 or greater) require safety equipment and take longer, adding 15-30% to the cost.
  • Moss severity — Light surface moss is quick to remove. Thick, established moss that has lifted shingles requires careful manual removal and may add $50-$150.
  • Roof type — Asphalt shingles are standard. Cedar shakes, tile roofs, and metal roofs may require specialized techniques. See our tile roof cleaning page for specific pricing.
  • Gutter cleaning — We recommend combining roof cleaning with gutter cleaning since moss debris will wash into gutters. Bundling saves 10-15%.

Roof Moss Removal Methods

Soft Wash Treatment (Recommended)

Soft washing is the safest and most effective method for roof moss removal in Vancouver. It uses low-pressure water combined with a biodegradable moss-killing solution that destroys moss at the root level. The treatment continues working for weeks after application, and moss gradually falls away with rain.

Cost: $300-$600 (standard pricing)
Pros: No risk of shingle damage, long-lasting results, prevents regrowth for 1-2 years

Manual Scraping + Treatment

For heavy moss buildup, manual removal with a soft brush or scraper may be needed before applying treatment. This is more labour-intensive but necessary when moss is thick enough to trap significant moisture.

Cost: $400-$700 (includes both manual removal and chemical treatment)
Pros: Immediate visual improvement, removes the heaviest moss

High-Pressure Washing (Not Recommended for Roofs)

We do not recommend high-pressure washing for roof moss removal. High pressure strips the protective granules from asphalt shingles, dramatically shortening their lifespan. Some cheaper companies still use this method because it is faster, but the damage it causes far outweighs the savings.

What to Expect During a Roof Moss Removal Appointment

Knowing the step-by-step process helps you prepare for your appointment and understand where your money goes. Here is what a typical roof moss removal service looks like when Shine City visits your Vancouver home:

  1. Ground-level inspection — Our technician walks the perimeter of your home, assessing moss coverage, roof pitch, and access points. We note any visible damage such as cracked or missing shingles before we begin.
  2. Property preparation — We move patio furniture, cover delicate plants, and pre-wet all landscaping and garden beds surrounding the home. This protects your plants from any cleaning solution contact.
  3. Heavy moss removal (if needed) — For roofs with thick moss, we use a soft-bristle brush or plastic scraper to gently dislodge the bulk of the growth. We always scrape downward with the grain of the shingles to avoid lifting edges.
  4. Soft wash application — Our biodegradable moss-killing solution is applied evenly across the entire roof surface using a low-pressure sprayer. The solution penetrates into moss root systems and under shingle edges where spores hide.
  5. Dwell and rinse — The solution is left to work for 15-20 minutes before a thorough low-pressure rinse removes dissolved moss, debris, and treatment residue.
  6. Gutter flush — All loosened moss and debris inevitably washes into the gutters, so we flush the entire gutter system to prevent new clogs.
  7. Final inspection — We inspect the finished roof from multiple angles, ensuring even coverage and consistent results across all sections.

Moss Removal Cost Comparison: DIY vs Professional

Some Vancouver homeowners consider tackling roof moss themselves to save money. Here is a realistic cost comparison:

  • DIY supplies (moss killer, pump sprayer, safety harness, ladder): $75-$200
  • DIY time investment: 4-8 hours for a standard home
  • Professional service: $300-$600 all-inclusive

The DIY approach carries significant risks. Walking on a mossy roof is extremely slippery, and falls from residential roofs account for thousands of emergency room visits in Canada each year. Incorrect chemical application can damage shingles, kill landscaping, or leave uneven results. Most importantly, homeowners lack the professional-grade equipment needed to apply treatment evenly across an entire roof surface, meaning moss often returns much sooner after a DIY attempt.

How to Prevent Roof Moss in Vancouver

Prevention is always cheaper than removal. Here are proven strategies to minimize moss growth on your Vancouver roof:

  • Zinc or copper strips — Installing metal strips along the roof ridge creates a natural moss inhibitor as rainwater washes trace metals down the roof. Cost: $200-$500 installed.
  • Tree trimming — Reducing shade and improving airflow across your roof significantly slows moss growth. Trim branches to maintain at least 10 feet of clearance.
  • Regular cleaning — Professional roof cleaning every 2-3 years prevents moss from establishing deep root systems. Maintenance cleaning costs less than heavy removal.
  • Keep gutters clear — Clogged gutters cause water to back up under shingles, creating a moist environment moss loves.

Vancouver Neighbourhoods Most Affected by Roof Moss

While roof moss is common across all of Metro Vancouver, certain areas are hit harder than others due to their geography and tree cover:

  • North Vancouver and West Vancouver — Heavy tree canopy from surrounding forests creates persistent shade. Many homes in these areas require annual roof treatment to keep moss under control.
  • East Vancouver (Hastings-Sunrise, Renfrew-Collingwood) — Older neighbourhoods with mature trees and original roofing materials that are more susceptible to moss penetration.
  • Kerrisdale and Dunbar — Established residential streets with large deciduous and evergreen trees lining properties.
  • Marpole and South Cambie — Lower elevation areas that stay damp longer after rain, particularly in fall and winter months.
  • Point Grey and Kitsilano — Coastal proximity adds moisture from marine air, compounding the effects of rainfall on moss growth.

Is Roof Moss Removal Worth the Cost?

Absolutely. Consider the math:

  • Roof moss removal: $300-$600 every 2-3 years
  • Premature roof replacement due to moss damage: $10,000-$25,000

Regular moss removal extends your roof’s lifespan by 5-10 years, saving you thousands. It also improves your home’s appearance, prevents water damage to your attic and interior, and maintains your property value.

Frequently Asked Questions About Roof Moss Removal

How long does roof moss removal take?

A professional roof moss removal typically takes 2-4 hours for a standard Vancouver home. Larger or heavily mossy roofs may take a full day. The soft wash treatment continues working for weeks after the initial application.

What time of year is best for roof moss removal in Vancouver?

Late spring (April-June) and early fall (September-November) are ideal for roof moss removal in Vancouver. However, we perform roof cleaning year-round. Applying moss treatment in fall is particularly effective because the treatment works throughout the wet winter months.

Will moss come back after removal?

Without preventive measures, moss will eventually return — Vancouver’s climate makes it inevitable. However, professional soft wash treatment inhibits regrowth for 1-2 years. Combining treatment with zinc strips and tree trimming can extend this to 3-5 years.

Can I remove roof moss myself?

While possible, DIY roof moss removal is risky. Walking on a mossy roof is extremely slippery and dangerous. Using incorrect pressure or techniques can damage shingles. Professional moss removal is relatively affordable and includes proper safety equipment and insurance coverage.

Does roof moss damage shingles?

Yes. Moss roots penetrate under shingle edges, lifting them and allowing water to seep underneath. Over time, this causes rot in the roof deck, leaks in your attic, and premature shingle failure. In Vancouver’s wet climate, moss damage is one of the leading causes of early roof replacement.

Does insurance cover roof moss removal?

Standard homeowner insurance policies in BC do not cover roof moss removal because it is considered routine maintenance. However, if moss damage leads to a covered peril such as water intrusion or structural damage, the resulting repairs may be partially covered under your policy. Regardless, the cost of regular moss removal is far less than any insurance deductible, making preventive maintenance the more practical approach.

Do you offer free estimates for roof moss removal?

Yes! Shine City provides free, no-obligation estimates for roof moss removal across Vancouver and the Lower Mainland. Contact us today to schedule yours.

Protect your roof and save thousands in the long run. Get your free roof moss removal estimate from Shine City Pressure Washing — Vancouver’s trusted roof cleaning experts with 290+ five-star Google reviews. Call (604) 229-5354 or request a quote online.

How to Choose a Roof Moss Removal Company in Vancouver

With many companies offering roof moss removal in Vancouver, choosing the right one is important. Here is what to look for when comparing providers:

  • Soft wash method — Avoid any company that uses high-pressure washing on your roof. This strips protective granules from shingles and voids many manufacturer warranties. Always confirm the company uses low-pressure soft washing.
  • Insurance and WorkSafeBC coverage — Roof work is inherently dangerous. Ensure the company carries commercial general liability insurance and is registered with WorkSafeBC. This protects you from liability if a worker is injured on your property.
  • Transparent pricing — Reputable companies provide a clear estimate before starting work. Be cautious of companies that give vague phone quotes without seeing your roof, as the final bill may exceed the initial estimate significantly.
  • Google reviews — Look for companies with a substantial number of reviews (50 or more) and a consistent rating of 4.5 stars or higher. Read recent reviews to ensure current service quality matches their reputation.
  • Guarantee on treatment — Professional moss treatment should come with a guarantee that moss will not return for a specified period, typically 12 to 18 months. If moss reappears within the guarantee window, the company should re-treat at no additional cost.

Shine City meets all of these criteria with 290+ five-star Google reviews, full insurance coverage, transparent flat-rate pricing, and a satisfaction guarantee on every roof moss removal job in Vancouver.

Categories
Pressure Washing Blog

Pressure Washing Prices in Surrey: What to Expect in 2026

How Much Does Pressure Washing Cost in Surrey, BC?

Pressure washing prices in Surrey range from $150 to $800+ depending on the service, surface area, and condition of the surface. Whether you need a driveway cleaned, a house washed, or a roof treated, understanding current pricing helps you budget for exterior maintenance and compare quotes from local companies.

At Shine City Pressure Washing, we serve all of Surrey — from South Surrey and White Rock to Cloverdale, Fleetwood, Guildford, Newton, and Whalley. Here is our comprehensive guide to pressure washing prices in Surrey for 2026.

Surrey Pressure Washing Prices by Service

Driveway Pressure Washing — $150-$350

Driveway pressure washing is one of the most popular services in Surrey. Pricing depends primarily on the driveway size and surface type:

  • Single-car driveway (200-400 sq ft): $150-$200
  • Double-car driveway (400-700 sq ft): $200-$275
  • Large/long driveway (700+ sq ft): $275-$350+

Concrete driveways with heavy oil stains, moss, or algae may cost an additional $25-$50 for pre-treatment. Exposed aggregate and paver driveways fall in the same price range.

House Washing — $250-$800

House washing in Surrey involves cleaning all exterior walls, soffits, fascia, gutters (outside), and trim. We use soft washing (low pressure + cleaning solution) on most homes to prevent damage:

  • Small home (under 1,500 sq ft): $250-$400
  • Medium home (1,500-2,500 sq ft): $400-$600
  • Large home (2,500+ sq ft): $550-$800+

Roof Cleaning — $300-$600

Roof cleaning removes moss, algae, lichen, and debris that damage shingles and reduce your roof’s lifespan. Pricing depends on roof size, pitch, and moss severity:

  • Standard roof (up to 1,500 sq ft): $300-$400
  • Large roof (1,500-2,500 sq ft): $400-$500
  • Extra large/steep roof (2,500+ sq ft): $500-$600+

Surrey’s wet climate makes moss growth inevitable. We recommend roof cleaning every 2-3 years to prevent costly shingle damage.

Gutter Cleaning — $100-$300

Gutter cleaning includes removing all debris from gutters and downspouts, flushing the system, and checking for proper drainage:

  • Single-storey home: $100-$175
  • Two-storey home: $150-$225
  • Three-storey or complex roofline: $200-$300

In Surrey, we recommend gutter cleaning at least twice per year — once in late fall after leaves drop, and once in spring.

Deck and Patio Cleaning — $150-$400

Deck and patio pressure washing prices depend on the surface material and area:

  • Small deck/patio (under 200 sq ft): $150-$225
  • Medium (200-400 sq ft): $225-$300
  • Large (400+ sq ft): $300-$400+

Cedar decks require lower pressure and specialized treatment — see our cedar deck restoration page for details.

Fence Cleaning — $100-$350

Fence cleaning restores weathered and moss-covered fences. Pricing is typically per linear foot:

  • Short fence (under 50 linear ft): $100-$150
  • Standard fence (50-100 linear ft): $150-$250
  • Long fence (100+ linear ft): $250-$350+

Pressure Washing Prices by Surrey Neighbourhood

While base pricing is consistent across Surrey, certain neighbourhoods tend to have characteristics that influence the final cost:

  • South Surrey and White Rock — Larger homes with extensive hardscaping and ocean-facing exteriors that collect salt spray. Average house wash: $500-$750.
  • Cloverdale and Clayton — Newer developments with smaller lots and standard-size homes. Average house wash: $350-$500. Many homes have Hardie board siding that responds well to soft washing.
  • Fleetwood and Fraser Heights — Mature tree cover means heavier moss and more frequent gutter cleaning. Average house wash: $400-$600.
  • Newton and Whalley — Mix of older and newer homes, many with stucco siding. Average house wash: $350-$550.
  • Guildford and Panorama Ridge — Established neighbourhoods with standard-size homes and moderate tree cover. Average house wash: $400-$550.

What Affects Pressure Washing Prices in Surrey?

Several factors influence the final price you will pay for pressure washing in Surrey:

  • Surface area — The single biggest factor. More square footage means more time and materials.
  • Surface condition — Heavy moss, deep stains, or years of neglect require additional passes and pre-treatment.
  • Surface type — Delicate surfaces like cedar, stucco, and vinyl siding require soft washing techniques.
  • Accessibility — Hard-to-reach areas, steep slopes, or limited water access can add to the cost.
  • Bundled services — Most companies, including Shine City, offer discounts when you combine multiple services (e.g., house wash + driveway + gutters).

How to Get the Best Price on Pressure Washing in Surrey

Here are our tips for getting the best value on pressure washing:

  • Bundle services — Combine house washing, driveway, and gutters in one visit to save 10-20% compared to booking separately.
  • Book in spring or early fall — These shoulder seasons often have more availability and potential promotions.
  • Maintain regularly — Annual or bi-annual cleaning prevents heavy buildup, which reduces cost per visit.
  • Get multiple quotes — Compare at least 2-3 companies, but beware of prices that seem too low — they often use inadequate equipment or skip proper cleaning techniques.

What to Look for When Hiring a Pressure Washing Company in Surrey

Not all pressure washing companies in Surrey deliver the same quality of service. Before hiring a company, check for these important qualifications:

  • Insurance coverage — Any reputable pressure washing company carries commercial general liability insurance and WorkSafeBC coverage. This protects you if something goes wrong during the job, such as accidental property damage or a worker injury on your property. Ask to see proof of insurance before hiring.
  • Google reviews and reputation — Online reviews are the most reliable indicator of service quality. Look for companies with a large number of reviews (50 or more) and a consistent rating of 4.5 stars or higher. Pay attention to how the company responds to negative reviews, as this reflects their professionalism.
  • Equipment quality — Professional companies use commercial-grade pressure washers (3,000-4,000 PSI) with surface cleaners, downstream injectors, and soft wash systems. Companies using consumer-grade equipment from hardware stores cannot deliver the same results.
  • Written estimates — A professional company provides a clear, written estimate before starting work. Be cautious of companies that give vague phone quotes without seeing your property, as the final bill often exceeds the initial estimate.
  • Soft wash capability — Any company that only offers high-pressure washing is behind the times. Modern exterior cleaning requires soft wash techniques for most residential surfaces. If a company does not mention soft washing, they may damage your siding, roof, or painted surfaces.

Frequently Asked Questions About Pressure Washing Prices

How much does pressure washing cost per square foot in Surrey?

Pressure washing in Surrey typically costs $0.15-$0.50 per square foot for flat surfaces like driveways and patios. House washing costs $0.10-$0.30 per square foot of wall area. The per-square-foot cost decreases as the total area increases.

Is it cheaper to pressure wash yourself?

Renting a pressure washer costs $75-$150 per day, but you also need to factor in your time, the risk of damage to surfaces, and inferior results. Many homeowners find that professional cleaning delivers far better results at only a modest premium over DIY. Plus, professionals carry insurance in case of accidental damage.

How often should I pressure wash my property in Surrey?

In Surrey’s wet climate, we recommend: driveways every 1-2 years, house washing every 1-2 years, roof cleaning every 2-3 years, and gutters twice per year. Regular maintenance keeps costs down and prevents damage from organic growth.

Why do pressure washing prices vary so much between companies?

Price differences usually come down to equipment quality, insurance coverage, and technique. Budget companies may use consumer-grade equipment, skip soft washing, or lack proper insurance. Mid-range and premium companies invest in commercial equipment, carry full insurance, and use the correct cleaning methods for each surface. The cheapest quote is rarely the best value when you factor in potential damage from improper techniques.

Do you offer free estimates?

Yes! Shine City provides free, no-obligation estimates for all pressure washing services in Surrey and across the Lower Mainland. Request your free estimate today.

Get transparent, fair pricing from Surrey’s most-reviewed pressure washing company. Contact Shine City for your free estimate — proudly serving Surrey with 290+ five-star Google reviews. Call (604) 229-5354 or request a quote online.

Window Cleaning Prices in Surrey

While not technically pressure washing, window cleaning is often bundled with exterior cleaning services. Typical window cleaning prices in Surrey:

  • Small home (10-15 windows): $150-$225
  • Medium home (15-25 windows): $225-$350
  • Large home (25-40 windows): $350-$500

Adding window cleaning to a house wash or gutter cleaning appointment is the most economical way to get this service done, as the crew is already on-site with equipment set up.

Commercial Pressure Washing Prices in Surrey

Commercial pressure washing in Surrey is priced differently from residential work, typically based on total square footage and the type of surface being cleaned:

  • Storefront washing: $200-$500 per visit
  • Parking lot and sidewalk cleaning: $0.10-$0.25 per square foot
  • Building exterior (soft wash): $0.15-$0.40 per square foot
  • Strata complex exterior cleaning: Custom quotes based on building count and size

Commercial clients benefit from recurring service agreements that lock in pricing and ensure consistent maintenance throughout the year. Restaurants, retail stores, medical offices, and strata properties are our most common commercial clients in Surrey. Learn more about our commercial services.

Pressure washing prices in Surrey remain consistent throughout the year, but demand fluctuates seasonally. Spring and early fall are the busiest periods, when booking 1-2 weeks in advance is advisable. Winter months see lower demand, which means more scheduling flexibility and faster booking. While some companies offer off-season discounts, Shine City maintains fair, consistent pricing year-round so you always know what to expect.

Strata and Multi-Unit Pressure Washing in Surrey

Strata complexes and townhouse developments across Surrey require regular exterior maintenance to maintain property values and meet strata council standards. Shine City works with dozens of strata properties in Surrey, offering customized maintenance programs that include house washing, gutter cleaning, common area pressure washing, and parking lot cleaning on a scheduled basis.

Strata pricing is typically more competitive than individual residential pricing due to the volume of work and the efficiency of cleaning multiple units in a single visit. Most strata contracts include quarterly or semi-annual visits, with pricing based on the number of units and total square footage. Strata councils appreciate our detailed reporting, which documents the work completed at each visit for council records and annual general meeting presentations.

For new strata clients in Surrey, we offer a complimentary property assessment and custom maintenance proposal. This assessment identifies the specific cleaning needs of the complex, recommends an appropriate service schedule, and provides transparent pricing that the council can budget for annually. Learn more about our strata and commercial services or contact us directly for a free assessment.

Understanding Pressure Washing Quotes in Surrey

When you receive a pressure washing quote in Surrey, it should clearly itemize the services included, the areas to be cleaned, and the total cost. A professional quote typically includes the cleaning method (pressure washing vs soft washing), the approximate square footage being cleaned, any pre-treatments required, and the timeline for completion. Be cautious of quotes that seem unusually low, as they may omit essential steps like soft washing for siding, proper detergent use, or post-cleaning gutter flush. A thorough job from a reputable company protects your surfaces and delivers results that last significantly longer than a quick spray-down from a budget operator.

Categories
Pressure Washing Blog

House Washing Cost in Vancouver: 2026 Price Guide

How Much Does House Washing Cost in Vancouver?

House washing in Vancouver typically costs between $250 and $800 for a standard residential home, depending on the size of the home, the type of siding, and the cleaning method used. Most Vancouver homeowners pay around $0.15 to $0.50 per square foot for professional exterior house washing.

Updated for 2026 with the latest best practices, pricing insights, and expert tips for Vancouver-area homeowners.

At Shine City Pressure Washing, we provide free, no-obligation estimates for house washing across Vancouver, Burnaby, Surrey, and the entire Lower Mainland. Our pricing is transparent and competitive, with most homes falling in the $350-$600 range.

What Factors Affect House Washing Prices in Vancouver?

Several factors determine the final cost of washing your home’s exterior in Vancouver:

  • Home size — A 1,200 sq ft home costs less than a 3,000 sq ft home. Most pricing is calculated per square foot of exterior wall area.
  • Number of storeys — Two and three-storey homes require specialized equipment and take longer, increasing the cost by 20-40%.
  • Siding material — Vinyl siding is the most straightforward to clean. Stucco, cedar, and Hardie board require gentler techniques like soft washing, which may cost slightly more.
  • Level of buildup — Heavy moss, algae, or years of grime require more time and product. Vancouver’s wet climate means many homes accumulate significant organic growth.
  • Accessibility — Homes with steep lots, extensive landscaping, or limited access points may cost more due to extra setup time.

Vancouver House Washing Prices by Home Size

Here is a general pricing guide for house washing in the Vancouver area:

  • Small home (under 1,500 sq ft): $250-$400
  • Medium home (1,500-2,500 sq ft): $400-$600
  • Large home (2,500-3,500 sq ft): $550-$750
  • Extra large home (3,500+ sq ft): $700-$1,000+

These prices include washing all exterior walls, soffits, fascia, and gutters (exterior). Trim, window frames, and downspouts are also cleaned as part of a standard house wash.

Soft Washing vs Pressure Washing: Which Costs More?

Soft washing uses low-pressure water combined with biodegradable cleaning solutions to safely remove algae, moss, mildew, and dirt. It is the preferred method for most Vancouver homes, especially those with vinyl siding, stucco, or painted wood. Soft washing typically costs the same or slightly more than traditional pressure washing because it uses specialized detergents.

Pressure washing uses high-pressure water to blast away dirt and grime. It works well for concrete, brick, and other hard surfaces but can damage softer siding materials. For house washing in Vancouver, we almost always recommend soft washing to protect your investment.

At Shine City, our house washing service uses a soft wash approach on all siding types, ensuring a thorough clean without any risk of damage.

House Washing Cost by Siding Type

Different siding materials require different cleaning approaches, and this can affect pricing. Here is what Vancouver homeowners can expect based on their siding type:

Vinyl Siding — $250-$700

Vinyl is the most common siding material in Metro Vancouver and the most straightforward to clean. It responds well to soft washing and typically does not require extended dwell times or repeat applications. Vinyl siding collects algae and mildew readily in Vancouver’s damp climate, but a single professional cleaning restores it to near-original condition.

Hardie Board (Fibre Cement) — $300-$750

James Hardie fibre cement siding is increasingly popular in newer Vancouver homes. It is durable but its textured surface can trap dirt and biological growth. Soft washing is the recommended method, as high pressure can chip the factory-applied paint finish. Cleaning costs are similar to vinyl but may take slightly longer due to the textured surface.

Stucco — $350-$800

Stucco is common on older Vancouver homes and many newer multi-family buildings. Its porous, rough surface is a magnet for algae, mold, and dirt. Cleaning stucco requires lower pressure and longer dwell times for the cleaning solution to penetrate the textured surface. Stucco cleaning often costs 10-20% more than vinyl due to the extra time and care required.

Cedar and Wood Siding — $400-$900

Wood siding, particularly Western red cedar, is common in older Vancouver neighbourhoods like Kitsilano, Mount Pleasant, and the West End. Wood is the most delicate siding material and absolutely must be soft washed. High pressure tears wood fibres and creates a rough, splintered surface. Cedar siding cleaning takes longer and requires specialized wood-safe cleaning solutions that will not strip natural oils from the wood.

Painted Surfaces — $300-$800

Homes with painted exterior surfaces need careful cleaning to avoid lifting or stripping the paint. Soft washing with appropriate solution strength cleans painted surfaces effectively without causing damage. If the existing paint is already peeling or failing, cleaning may reveal additional areas that need repainting, which is useful information to have before investing in a new paint job.

How Often Should You Wash Your House in Vancouver?

Vancouver’s rainy climate creates ideal conditions for moss, algae, and mildew growth on home exteriors. We recommend professional house washing every 1-2 years depending on your home’s exposure and surrounding vegetation.

Homes under heavy tree cover or on the north side of a hill may need annual washing. Homes in more open, sun-exposed areas can often go 2-3 years between cleanings. Regular maintenance washing also costs less per visit since there is less buildup to remove.

Why Hire a Professional House Washing Company?

While DIY house washing is possible, hiring a professional pressure washing company in Vancouver offers several advantages:

  • Safety — Working at heights with pressurized water is dangerous. Professionals have the proper equipment, training, and insurance.
  • Efficiency — A professional crew can wash most homes in 2-4 hours. DIY can take an entire weekend.
  • Results — Professional-grade equipment and detergents deliver far superior results compared to a garden hose or rented pressure washer.
  • Protection — Incorrect pressure settings can damage siding, force water behind walls, or strip paint. Professionals know the right technique for each surface.

Does House Washing Increase Property Value?

Yes! Studies show that professional exterior cleaning can increase a home’s curb appeal and perceived value by 5-10%. In Vancouver’s competitive real estate market, a clean exterior makes a strong first impression for potential buyers. Many realtors recommend house washing as a cost-effective way to prepare a home for sale.

Best Time of Year for House Washing in Vancouver

House washing can be performed year-round in Vancouver’s mild climate, but certain seasons offer advantages:

  • Spring (March-May) — The most popular time for house washing. After the wet winter months, homes have accumulated significant moss, algae, and grime. A spring wash freshens up the exterior and prepares your home for the warmer months.
  • Summer (June-August) — Warm, dry conditions mean surfaces dry quickly and cleaning solutions work efficiently. Summer is ideal if you are planning to repaint or stain after cleaning.
  • Fall (September-November) — Cleaning before the rainy season removes organic buildup and reduces the amount of moisture that biological growth can cling to during winter.
  • Winter (December-February) — While possible, winter house washing is less common due to shorter daylight hours and cooler temperatures that slow drying. However, Vancouver’s mild winters mean it is still a viable option on dry days.

Frequently Asked Questions About House Washing Cost

How much does it cost to power wash a house in Vancouver?

Power washing (soft washing) a house in Vancouver costs $250-$800 depending on the home’s size and condition. The average Vancouver homeowner pays $400-$550 for a complete exterior house wash including walls, soffits, gutters, and trim.

Is house washing worth the money?

Absolutely. Professional house washing removes harmful organic growth that can damage your siding over time. It is far cheaper than repainting or replacing siding, and it keeps your home looking its best. Regular washing extends the life of your exterior finishes by years.

Can you wash a house in the rain?

Yes, house washing can be done in light rain since we are applying water and cleaning solution anyway. However, heavy downpours can dilute the detergent and reduce effectiveness, so we may reschedule in severe weather. In Vancouver, waiting for a perfectly dry day would mean very few available work days!

What is the best time of year for house washing in Vancouver?

Spring (March-May) and early fall (September-October) are the most popular times for house washing in Vancouver. Spring cleaning removes winter moss and grime, while fall washing prepares your home for the wet season. However, we offer house washing year-round in Vancouver’s mild climate.

How long does a professional house wash take?

Most Vancouver homes take 2-4 hours for a complete exterior house wash. Smaller homes may be finished in as little as 90 minutes, while larger or heavily soiled homes can take up to 5 hours. Our crew handles everything from setup to cleanup, so you do not need to be present during the service.

Do you offer free estimates for house washing?

Yes! Shine City provides free, no-obligation estimates for all house washing projects in Vancouver, Surrey, Burnaby, and across the Lower Mainland. Contact us today for your free quote.

Ready for a cleaner home? Get your free house washing estimate from Shine City Pressure Washing — Vancouver’s trusted exterior cleaning professionals with 290+ five-star Google reviews. Call (604) 229-5354 or request a quote online.

House Washing Before Selling Your Vancouver Home

If you are preparing to sell your home in Vancouver’s competitive real estate market, professional house washing is one of the highest-return investments you can make. Realtors consistently report that a clean exterior creates a significantly stronger first impression during showings and open houses. The cost of a professional house wash ($350-$600 for most homes) is negligible compared to the potential impact on your sale price.

For sellers, we recommend scheduling house washing 1-2 weeks before listing photos are taken. This ensures the exterior looks its absolute best in online listings, where most buyers form their first impression. Combine house washing with window cleaning and driveway pressure washing for maximum curb appeal. Many of our Vancouver clients who are preparing to sell opt for our full exterior package, which includes house wash, windows, driveway, gutters, and walkways.

Bundling Services for the Best Value

The most cost-effective approach to house washing in Vancouver is to bundle it with other exterior cleaning services during the same visit. When our crew is already on-site with equipment set up, adding services takes less time than scheduling them individually. Popular combinations include:

  • House wash + driveway cleaning — Saves 10-15% vs booking separately
  • House wash + gutter cleaning — Clean walls look odd with overflowing gutters
  • House wash + window cleaning — The complete curb appeal package
  • Full exterior package (house + driveway + gutters + windows) — Maximum savings of 15-20%

Whether you need a basic maintenance wash or a deep clean for a home that has not been washed in years, Shine City has the experience and equipment to restore your home’s exterior to like-new condition. With over 290 five-star Google reviews and thousands of homes cleaned across Metro Vancouver, we are the Lower Mainland’s most trusted house washing company. Schedule your free estimate today and see the difference professional house washing makes.

Categories
Pressure Washing Blog

Pressure Hose for Pressure Washer

Estimated reading time: 5 minutes

Updated for 2026 with the latest best practices, pricing insights, and expert tips for Vancouver-area homeowners.

Summary

The right equipment is paramount in achieving a clean and sparkling result when using a pressure washer. Among these, the pressure washer hose stands out as a crucial component. Also known as a pressure cleaner hose or power washer hose, it plays a pivotal role in delivering the high-pressure water necessary for effective cleaning. With many options available, selecting a pressure hose that caters to your specific needs is crucial.

Pressure Cleaner Hose Material

A pressure hose for a pressure washer, also called a wash hose or pressure washer lines, should be durable, flexible, and capable of withstanding high water pressure. When shopping for a pressure washer hose, it is important to consider your unique needs. The first consideration is the material of the hose. High-quality hoses are typically constructed from flexible materials that can endure the wear and tear of regular use. Additionally, a flexible pressure washer hose is essential for maneuvering around objects and reaching tight spaces during cleaning tasks.

There are three main materials used in pressure washer hoses, and each has distinct advantages:

  • Rubber hoses – These are the most durable and flexible option. Rubber hoses resist kinking, handle extreme temperatures well, and last the longest under heavy use. They are the preferred choice for professional pressure washing companies like Shine City. The main downside is that they are heavier and more expensive than other options.
  • PVC hoses – Lightweight and affordable, PVC hoses are commonly bundled with consumer-grade pressure washers. They work fine for occasional home use, but they tend to kink more easily, stiffen in cold weather, and wear out faster than rubber. If you only pressure wash a few times a year, a PVC hose may be sufficient.
  • Polyurethane hoses – These sit in the middle ground between rubber and PVC. Polyurethane hoses are lighter than rubber but more durable than PVC. They offer good flexibility and resist abrasion well, making them a solid choice for homeowners who use their pressure washer regularly.

For professional-grade results, rubber is almost always the best choice. If you are a homeowner looking for a balance between cost and performance, polyurethane is worth considering.

Pressure Washer Hose Length

Another critical aspect to keep in mind is the length of the hose. Depending on the size of the area you intend to clean, a longer hose may be necessary to provide sufficient reach without having to move the pressure washer frequently. On the other hand, if portability is a priority, a shorter hose may be more suitable for your needs.

Pressure washer hoses typically come in lengths ranging from 25 feet to 100 feet. Here is a general guide to help you choose:

  • 25 feet – Best for small, contained jobs like washing a single vehicle or a small patio. Very manageable but limits your range significantly.
  • 50 feet – The most popular length for residential use. It gives you enough reach to clean a driveway, deck, or one side of a house without constantly repositioning the machine.
  • 75-100 feet – Ideal for larger properties or professional use. Longer hoses let you park the pressure washer in one spot and work around an entire house. However, keep in mind that very long hoses can cause slight pressure drops at the nozzle.

One important note: never try to extend your reach by connecting multiple short hoses together with adapters. Each connection point is a potential failure point and leak source. It is always better to invest in a single hose of the right length.

Furthermore, the hose for a pressure washer should be compatible with the specific model of your power washer. Ensuring that the pressure hose is the correct size and has the appropriate power washer hose connector is crucial for a secure and leak-free connection. This compatibility will also guarantee optimal performance and safety during operation, providing you with peace of mind.

Hose for Jet Wash Maximum Pressure

Water pressure is another critical consideration when selecting a pressure washer garden hose. The hose must handle the water pressure your pressure washer generates without bursting or leaking. Choose a water pressure hose with a PSI (pounds per square inch) rating higher than your pressure washer’s maximum pressure output to ensure durability and safety.

Most consumer pressure washers operate between 1,300 and 2,800 PSI, while professional units can reach 3,000 to 4,000 PSI or higher. Here is what to look for in terms of hose PSI ratings:

  • Up to 3,200 PSI – Suitable for most residential electric pressure washers and light-duty gas models.
  • 3,200 to 4,000 PSI – Designed for mid-range gas pressure washers used by serious homeowners and small contractors.
  • 4,000 to 5,000+ PSI – Heavy-duty hoses built for commercial and professional pressure washers. These are what companies like Shine City use on job sites daily.

Always choose a hose rated at least 500 PSI above your machine’s maximum output. This safety margin accounts for pressure spikes that can occur during normal operation and extends the life of your hose significantly.

Connector Types and Compatibility

The fittings on your pressure hose for a pressure washer matter just as much as the hose itself. An incompatible or poor-quality connector will leak, reduce pressure, or even blow off under load. There are several common connector types you should know about:

  • M22 threaded fittings – The most common connector on consumer pressure washers. These screw-on fittings come in two sizes (14mm and 15mm internal diameter), so double-check which one your machine uses before purchasing a hose.
  • Quick-connect (QC) fittings – These snap-on connectors make it fast and easy to attach and detach hoses. They are popular on mid-range and professional machines. Quick-connect fittings come in various sizes, with 3/8-inch being the most common for pressure washers.
  • Twist-connect fittings – Found on some specific brands, these require a twist-and-lock motion to secure. They are less universal but provide a reliable seal.

If you are replacing a hose, the simplest approach is to bring your old hose (or at least photos of both ends) to the store to ensure you get the right fittings. Adapter kits are available, but a direct-fit hose will always provide a more reliable connection.

Maintaining Your Pressure Washer Hose

A well-maintained pressure hose for a pressure washer will last years longer than a neglected one. Follow these maintenance tips to get the most out of your investment:

  • Drain after every use – Disconnect the hose and let all water drain out completely. Standing water left inside can freeze in cold weather and damage the hose from the inside.
  • Store properly – Coil the hose loosely on a hose reel or hang it in large loops. Avoid tight bends or kinks during storage, as these create weak spots over time.
  • Keep out of direct sunlight – UV exposure degrades PVC and polyurethane hoses faster. Store your hose in a garage or shed when not in use.
  • Inspect fittings regularly – Check the O-rings and seals at both ends of the hose for cracks or wear. Replace them at the first sign of leaking rather than over-tightening the connection.
  • Avoid dragging over rough surfaces – Concrete edges, gravel, and sharp corners will abrade the outer layer of your hose. Lift the hose over obstacles instead of dragging it.

When to Replace Your Pressure Hose

Even with proper care, every pressure washer hose has a limited lifespan. Here are the signs that it is time for a replacement:

  • Visible cracks, cuts, or bulges in the hose body
  • Persistent leaking at the fittings despite replacing O-rings
  • The hose feels stiff and refuses to coil smoothly
  • Noticeable pressure loss at the nozzle compared to when the hose was new
  • The outer covering is worn through, exposing the reinforcement layer underneath

A failing hose is not just an inconvenience — it is a safety hazard. A burst hose under 3,000+ PSI can cause serious injury. When in doubt, replace it.

In conclusion, the right pressure hose for your pressure washer is essential for outstanding cleaning results. By considering factors such as material, length, PSI rating, connector type, and maintenance practices, you can select a hose that meets your specific requirements and enhances the performance of your pressure washing tasks. If you would rather skip the equipment decisions entirely and let professionals handle the job, get a free quote from Shine City and we will bring everything needed to get your property looking its best.

Read More

Frequently Asked Questions

What size pressure hose do I need for my pressure washer?

The most common pressure washer hose sizes are 1/4-inch and 3/8-inch internal diameter. A 1/4-inch hose works for most residential electric pressure washers under 3,000 PSI. Gas-powered units producing 3,000+ PSI require a 3/8-inch hose for adequate flow. Using a hose that’s too small restricts water flow and reduces cleaning power.

How long should a pressure washer hose be?

A 25-foot hose works for small jobs, but a 50-foot hose gives the most versatility for residential use. Longer hoses (100 feet) lose some pressure due to friction, so use the shortest hose practical for your job. For large properties, a hose reel keeps longer hoses organized and tangle-free.

Can I use a garden hose as a pressure washer hose?

No. Garden hoses are not rated for the high pressures generated by pressure washers (1,500 to 4,000+ PSI). Using a garden hose is dangerous and will likely burst under pressure, causing injury or property damage. Always use a hose specifically rated for your pressure washer’s PSI and GPM output.

How often should I replace my pressure washer hose?

Inspect your hose before each use for cracks, bulges, kinks, or worn fittings. Most quality pressure washer hoses last 3 to 5 years with proper care. Replace immediately if you notice any damage. Store hoses coiled loosely in a dry area away from sunlight, which degrades rubber over time.

Is it better to hire a professional instead of buying pressure washing equipment?

For occasional cleaning, hiring a professional is often more cost-effective than buying and maintaining equipment. Professional-grade machines deliver better results, and trained technicians know the right pressure and detergents for each surface. Shine City serves Metro Vancouver with expert pressure washing—call (604) 229-5354 or get a free quote.

Choosing the Right Hose for BC’s Climate

If you live in British Columbia, your pressure washer hose faces unique challenges that homeowners in drier climates do not encounter. The Lower Mainland’s heavy rainfall means your hose will be exposed to moisture for extended periods, making rust-resistant fittings essential. Brass or stainless steel connectors resist corrosion far better than standard zinc-plated fittings, which can seize up after repeated exposure to rain and humidity.

Cold winter mornings in the Fraser Valley can occasionally drop below freezing, and any water left inside a hose will expand as it freezes. This expansion weakens the hose walls over time and can cause fittings to crack. Always drain your hose completely after each use during the colder months, and consider storing it indoors during winter rather than leaving it on an outdoor reel.

The combination of frequent use and damp conditions in BC also accelerates mould growth on hose exteriors. While this does not affect performance, wiping down your hose with a mild bleach solution a few times per season keeps it clean and prevents the rubber from degrading prematurely. A well-maintained hose in the Lower Mainland should still achieve the same 3-5 year lifespan as anywhere else, provided you follow proper care guidelines.

With dozens of pressure washer hose brands on the market, narrowing down the options can be overwhelming. Here are proven recommendations for different use cases:

  • Flexzilla (3/8-inch, 50 feet) — An excellent all-around choice for homeowners. The hybrid polymer material is more flexible than rubber in cold weather and lighter to handle. Rated for 4,200 PSI, it handles most residential and mid-range gas pressure washers with ease.
  • Simpson MorFlex (5/16-inch and 3/8-inch) — A popular budget-friendly option that comes standard with many Simpson pressure washers. The cold-weather flexibility is above average for a non-rubber hose, making it a solid choice for BC’s cooler months.
  • Raptor Blast Wire Braid (3/8-inch, 100 feet) — The go-to hose for professional contractors. Its wire-reinforced rubber construction is nearly indestructible and rated for 6,000 PSI. This is the type of hose Shine City uses on commercial job sites where reliability is non-negotiable.

Whichever brand you choose, always match the hose specifications to your pressure washer’s output. Buying a hose rated well above your machine’s maximum PSI provides a safety margin that extends hose life and keeps you protected.

Categories
Pressure Washing Blog

How To Clean A Metal Roof

Professional metal roof cleaning in Vancouver BC - Shine City soft wash method

Metal roofs are one of the most durable roofing options available, lasting 40 to 70 years when properly maintained. But here in Vancouver and Surrey, BC, our wet coastal climate creates the perfect breeding ground for moss, algae, and lichen — and even the toughest metal roof isn’t immune. Months of rain, followed by mild temperatures and shade from surrounding trees, mean organic growth can take hold faster than most homeowners realize. Left unchecked, that green film isn’t just an eyesore — it traps moisture against your roof’s surface, accelerates wear on protective coatings, and can eventually lead to costly repairs. The good news? Cleaning a metal roof is straightforward when you know the right approach. In this guide, we’ll walk you through everything you need to know — from the tools and techniques to use, to the mistakes that can void your warranty or damage your roof.

Updated for 2026 with the latest best practices, pricing insights, and expert tips for Vancouver-area homeowners.

Why You Need to Clean Your Metal Roof

Even though metal roofs resist rot and insect damage, they still accumulate dirt, moss, algae, and debris over time. In British Columbia’s wet climate, this buildup happens faster than in drier regions. Here’s why regular cleaning matters:

Prevents moss and algae damage. Moss roots can work their way under panel seams and fasteners, creating entry points for water. Algae holds moisture against the surface, which gradually breaks down protective paint and coatings.

Protects your roof’s finish. Most metal roofs have a factory-applied coating — usually Kynar, silicone-modified polyester, or a basic acrylic. Dirt and biological growth degrade these coatings over time, leading to chalking, fading, and eventually bare metal exposed to the elements.

Maintains energy efficiency. A clean metal roof reflects sunlight effectively, keeping your attic and home cooler in summer. A layer of dark algae or grime reduces that reflectivity, forcing your cooling system to work harder.

Keeps your warranty intact. Many metal roof manufacturers require regular maintenance — including cleaning — as a condition of their warranty. Neglecting it could mean you’re on the hook for repairs that would otherwise be covered.

How Often Should You Clean a Metal Roof?

As a general rule, metal roofs should be cleaned at least once a year. But if you live in the Lower Mainland or Fraser Valley, twice a year is a smarter schedule — once in spring after the wet season to remove accumulated moss and algae, and once in fall to clear leaves, needles, and debris before the rains return.

You may need to clean more frequently if your home is surrounded by overhanging trees (especially cedar, fir, or maple), if your roof is north-facing and gets limited direct sunlight, or if you notice green or black streaks appearing between cleanings. Properties near wooded areas in Surrey, Langley, and Maple Ridge tend to need the most attention. If you’re unsure, a quick visual inspection from the ground each season will tell you whether it’s time.

Types of Metal Roofs and How Cleaning Differs

Not all metal roofs are the same, and the cleaning approach should match the material. Here are the most common types you’ll find on homes in the Vancouver area:

Painted steel (standing seam or corrugated). The most common residential metal roof. The paint layer is the primary protection, so you need to avoid anything abrasive that could scratch or strip it. Use soft cloths or soft-bristle brushes and gentle detergent solutions.

Galvanized steel. Protected by a zinc coating rather than paint. It’s more forgiving than painted steel, but harsh chemicals — especially acidic ones — can eat through the zinc layer. Stick to pH-neutral or mildly alkaline cleaners.

Aluminum. Lightweight and naturally corrosion-resistant, but softer than steel. It scratches easily, so avoid stiff brushes and high-pressure nozzles. Mild soap and water work well for routine cleaning.

Copper. Develops a natural green patina over time that many homeowners want to preserve. If that’s you, limit cleaning to gentle rinsing and debris removal. If you want to restore the original copper look, specialized copper cleaners are available — but know that the patina will return.

Regardless of material, always check your manufacturer’s cleaning recommendations before you start. Some coatings have specific restrictions on which chemicals are safe to use.

Tools and Supplies You’ll Need

For a basic DIY metal roof cleaning, gather the following before you climb up:

  • Garden hose with spray nozzle — A standard hose provides enough pressure for rinsing without risking damage. A fan-style nozzle works best.
  • Soft-bristle brush or broom — For scrubbing stubborn spots. Never use wire brushes or steel wool on metal roofing.
  • Bucket and mild detergent — Dish soap (a few tablespoons per gallon of water) is effective for general dirt and grime.
  • Bleach solution or white vinegar — For moss and algae. A mix of one part household bleach to ten parts water kills most organic growth. White vinegar is a gentler alternative.
  • Safety harness and roof anchors — Non-negotiable for any pitched roof work.
  • Rubber-soled shoes — Metal roofs are slippery, especially when wet. Proper footwear with good grip is essential.
  • Garden sprayer (pump-style) — Useful for applying cleaning solution evenly across large areas.

Step-by-Step: How to Clean a Metal Roof

Once you have your supplies ready and the weather is cooperating (overcast, mild, and dry), follow these steps for a thorough cleaning:

Step 1: Clear loose debris. Use a soft broom or leaf blower to remove leaves, pine needles, branches, and any loose dirt. Pay special attention to valleys, ridges, and areas around vents and skylights where debris tends to accumulate.

Step 2: Rinse the entire roof. Starting at the ridge and working downward, rinse the roof with your garden hose. This removes surface dust and loosens any stuck-on grime. Always work from the top down so dirty water flows away from the areas you’ve already cleaned.

Step 3: Mix your cleaning solution. In a bucket or garden sprayer, combine warm water with your chosen cleaner — mild dish soap for general cleaning, or a diluted bleach solution (1:10 ratio) if you’re dealing with moss or algae. For an eco-friendlier option, mix equal parts white vinegar and water.

Step 4: Apply the solution. Using your garden sprayer or a sponge, apply the cleaning solution across one section at a time. Don’t try to do the whole roof at once — you want the solution to stay wet while it works. Let it sit for 5 to 10 minutes, but don’t let it dry on the surface.

Step 5: Scrub problem areas. For spots where moss, algae, or stains are stubborn, use your soft-bristle brush to gently scrub. Work in the direction of the panel ribs (lengthwise, not across) to avoid pushing water or debris under seams.

Step 6: Rinse thoroughly. Once you’ve scrubbed each section, rinse it completely with your garden hose. Make sure no cleaning solution residue remains — soap left on the surface can attract dirt and actually make things worse.

Step 7: Inspect and touch up. After the roof has dried, do a walk-around inspection from the ground. Look for any spots you missed, signs of rust or coating damage, loose fasteners, or damaged sealant around penetrations. Address any issues now before they become bigger problems. This is also a good time to clean your gutters, since all that debris and rinse water has likely washed into them.

Can You Pressure Wash a Metal Roof?

This is one of the most common questions we get at Shine City, and the answer requires some nuance. Technically, yes — you can use a pressure washer on a metal roof. But it comes with significant risks if done incorrectly.

High-pressure water (above 1,500 PSI) can strip factory paint coatings, dent thinner gauge metal panels, force water under seams and fasteners causing leaks, and blast away the protective zinc layer on galvanized roofs. Even at lower pressures, a concentrated nozzle tip held too close to the surface can cause permanent damage.

That’s why we use the soft wash method for all of our roof cleaning projects. Soft washing combines low-pressure water (typically under 500 PSI) with professional-grade cleaning solutions that do the heavy lifting. The chemicals kill moss, algae, and bacteria at the root level, while the gentle rinse removes everything without putting your roof at risk. It’s more effective than pressure alone because it treats the cause — not just the visible symptoms — which means your roof stays cleaner for longer.

If you’re set on doing it yourself, keep the pressure below 1,200 PSI, use a wide fan tip (25 or 40 degree), maintain at least 12 inches of distance from the surface, and always spray in the direction water would naturally flow — never up under the panels.

How to Remove Specific Stains from a Metal Roof

General cleaning handles most dirt and grime, but certain stains need targeted treatment. Here’s how to tackle the most common ones:

Moss and algae. A diluted bleach solution (1 part bleach to 10 parts water) is the most effective treatment. Apply it, let it sit for 10 to 15 minutes, then scrub lightly and rinse. For heavy growth, you may need a second application. Oxygen bleach (sodium percarbonate) is a less harsh alternative that’s safer for surrounding plants.

Rust stains. Rust spots on or below metal roofing usually come from fasteners, flashing, or metal particles left from installation. Oxalic acid-based cleaners (available at most hardware stores) work well. Apply the cleaner, let it react for a few minutes until you see the stain dissolving, then rinse. Avoid letting acidic cleaners sit too long on galvanized surfaces.

Tree sap and pitch. Rubbing alcohol or mineral spirits applied with a soft cloth will dissolve most tree sap. Work gently and avoid aggressive scrubbing, which can dull the finish. Rinse the area with soapy water afterward to remove any solvent residue.

Chalking and oxidation. Over time, painted metal roofs develop a chalky residue as the paint coating breaks down. A solution of mild detergent and water, combined with gentle scrubbing, removes most surface chalking. If the chalking is severe, it may be time to consider recoating the roof rather than just cleaning it.

Oil and grease. Degreasing dish soap or a dedicated degreaser works for oil-based stains from nearby trees, HVAC equipment drips, or other sources. Apply, let it break down the oil for a few minutes, scrub, and rinse.

With any stain treatment, always test your cleaning solution on a small, inconspicuous area first. This confirms it won’t discolour or damage the finish before you apply it to a visible section of your roof.

Metal Roof Cleaning Safety Tips

Metal roofs are inherently more dangerous to work on than asphalt shingles — the smooth surface becomes extremely slippery when wet, and the steep pitch on many metal roof designs increases the fall risk. Keep these safety rules in mind:

  • Never work alone. Always have someone on the ground who can call for help if something goes wrong.
  • Use a fall protection harness anchored to a secure roof anchor point. This is not optional — it’s required by WorkSafeBC for any work at heights.
  • Wear rubber-soled shoes with good tread. Avoid boots with worn-down soles or hard plastic bottoms.
  • Avoid cleaning on wet, hot, or windy days. Wet metal is a slip hazard. Hot metal can cause cleaning solutions to dry too fast and leave streaks or residue. Wind makes ladder work and balance unpredictable.
  • Protect your landscaping. Bleach and chemical cleaners can damage or kill plants below. Wet down your garden beds and shrubs before and after cleaning, or cover them with tarps.
  • Know when to call a professional. If your roof is steeply pitched, more than one story high, or you’re not confident working at heights, hiring a pro is the smart move. No cleaning project is worth a serious injury.

Professional vs. DIY Metal Roof Cleaning

Both approaches have their place. Here’s an honest breakdown to help you decide:

DIY cleaning typically costs $100 to $250 in supplies and equipment rental. It’s a reasonable option if your roof is single-story with a low pitch, you’re comfortable with ladder and roof work, the roof just needs a general wash without heavy staining, and you have the proper safety gear. The main risks are personal injury from falls, accidental damage to the roof coating from wrong chemicals or technique, and voiding your warranty by using unapproved cleaning methods.

Professional cleaning runs $250 to $600 for most residential metal roofs in the Vancouver area, depending on size, pitch, and the amount of buildup. What you get for that investment is trained technicians who know how to handle different roof types safely, professional-grade cleaning solutions that are more effective (and longer-lasting) than retail products, liability insurance that covers any accidental damage, and a finished result that typically stays clean two to three times longer than a DIY job.

Our recommendation? If you have a simple, accessible roof and enjoy hands-on home maintenance, DIY is fine for annual upkeep. But for deeper cleaning, stain removal, or any roof that makes you nervous to walk on, professional roof cleaning is worth the investment. You’ll get a better result and keep your warranty and your body intact.

Keep Your Metal Roof Clean Longer

Once your roof is clean, a few preventive steps will help it stay that way longer between cleanings:

  • Trim overhanging branches. Trees that shade your roof and drop leaves, needles, or sap create ideal conditions for moss growth. Keep branches cut back at least 6 feet from the roof surface.
  • Clean your gutters regularly. Clogged gutters cause water to back up under roof edges, leading to moisture problems and staining. Aim for gutter cleaning at least twice a year in BC.
  • Install zinc or copper strips. Placed along the roof ridge, these metal strips release ions when it rains that inhibit moss and algae growth on the panels below. They’re inexpensive and effective as a preventive measure.
  • Schedule annual inspections. A quick visual check each spring and fall catches small problems — loose fasteners, sealant failures, early moss growth — before they become expensive repairs.
  • Clear debris after fall storms. BC’s autumn storms bring down a lot of organic material. Clearing leaves and branches promptly prevents them from decomposing on your roof and feeding new growth.

Frequently Asked Questions

What is the best cleaner for a metal roof?

For general cleaning, a mild dish soap diluted in water is all you need. For moss and algae, a 1:10 bleach-to-water solution or an oxygen bleach product works well. Avoid harsh acids, undiluted bleach, and abrasive cleaners — they can damage your roof’s protective coating. Always check your manufacturer’s warranty documents for approved cleaning products.

Will cleaning my metal roof void the warranty?

It shouldn’t — in fact, most manufacturers require regular cleaning as part of their warranty terms. However, using the wrong cleaning methods or chemicals can void your coverage. Avoid abrasive tools, harsh acids, and high-pressure washing unless your manufacturer specifically approves it. When in doubt, contact your roofing manufacturer or hire a professional who’s familiar with your roof type.

How long does a metal roof last with proper maintenance?

A well-maintained metal roof can last 40 to 70 years, depending on the material and coating quality. Standing seam steel and aluminum roofs with high-quality coatings (like Kynar 500) tend to be at the upper end. Regular cleaning, prompt repairs, and keeping debris off the surface are the biggest factors in maximizing lifespan.

Is it safe to walk on a metal roof?

It depends on the roof. Standing seam metal roofs are generally safe to walk on if you step on the flat areas between the seams. Corrugated and ribbed panels can dent if you step in the wrong spot. Always wear rubber-soled shoes, use a safety harness, and avoid walking on wet metal. If you’re unsure, it’s safer to clean from a ladder or hire a professional.

Should I seal or coat my metal roof after cleaning?

Not necessarily after every cleaning, but it’s worth inspecting the existing coating. If you see widespread chalking, fading, or bare metal showing through, a recoating may be due. Sealant around fasteners, seams, and flashing should be checked annually and touched up as needed. A fresh coat of elastomeric roof coating every 10 to 15 years can extend the life of an aging metal roof significantly.

Can I clean a metal roof in the rain?

It’s not recommended. Rain makes metal surfaces extremely slippery, creating a serious fall hazard. Your cleaning solution also gets diluted and washed away before it can work effectively. Wait for a dry, overcast day — ideally with mild temperatures so the solution doesn’t evaporate too quickly on hot panels.

Need Help? Let Shine City Handle It

If climbing on your roof and mixing cleaning solutions isn’t your idea of a good weekend, we get it. At Shine City, we specialize in professional roof cleaning and soft washing for homes across Vancouver, Surrey, and the Lower Mainland. Our soft wash method safely removes years of moss, algae, and grime from metal roofs without risking damage to your panels or coatings — and it stays clean longer than a DIY scrub.

We also offer house washing and gutter cleaning if you want to tackle everything at once. Get in touch for a free quote — we’ll take an honest look at your roof and let you know exactly what it needs.

Categories
Pressure Washing Blog

How Often Do You Need To Clean Your Roof?

Keeping your roof clean is not merely about aesthetics; it is an essential part of property maintenance. But how often do you need to clean your roof? In this article, we will outline the ideal timeline for regular roof cleaning, break down considerations by roof type, and explain why it is crucial to maintaining your home’s overall health and longevity.

Updated for 2026 with the latest best practices, pricing insights, and expert tips for Vancouver-area homeowners.

How Often Do You Need To Clean Your Roof

Why Regular Roof Cleaning is Important

Regular roof cleaning is a key aspect of home upkeep. A clean roof not just boosts your property’s curb appeal but also guards against potential damage. Deposits of algae, moss, and other organisms can cause serious harm to your roof. These elements retain moisture against the surface of your roof, which, over an extended period, can lead to substantial damage.

In British Columbia, the combination of mild temperatures and persistent rainfall creates the perfect breeding ground for moss and algae. Left unchecked, moss roots can work their way under shingles and tiles, lifting them and creating gaps where water penetrates. Over several years, this can lead to rotting roof decking, interior leaks, and the need for premature roof replacement — a cost that can run into tens of thousands of dollars.

Ideal Timeline for Residential Roof Cleaning

For the average residential home, a comprehensive roof cleaning is typically required every two to three years. Still, several factors could necessitate more frequent cleanings, including your geographical location, climate, and the type of trees surrounding your property. For example, homes surrounded by tall trees might require more regular cleanings due to the accumulation of leaves, bird droppings, and other organic matter on the roof.

Roof Type Considerations

Different roofing materials respond differently to the elements, and each has its own cleaning requirements. Understanding what your roof is made of helps you determine the right cleaning schedule.

Asphalt Shingles

Asphalt shingles are the most common roofing material in the Lower Mainland. They are relatively affordable but are prone to algae streaking and moss growth in our damp climate. Cleaning every two to three years is standard, but north-facing sections that receive less sunlight may need attention more frequently. It is important to use low-pressure soft washing rather than high-pressure methods, as aggressive pressure can strip the protective granules from the shingles and shorten their lifespan.

Metal Roofing

Metal roofs are durable and naturally resistant to moss because their smooth surface does not give moss much to grip. However, they are not immune to algae staining, dirt buildup, and the accumulation of debris in valleys and around fasteners. A cleaning every three to five years is usually sufficient for metal roofs, though you should inspect them annually for any signs of corrosion or discolouration.

Concrete and Clay Tile

Tile roofs are long-lasting but their textured, porous surfaces are highly susceptible to moss and algae growth. In BC’s wet climate, tile roofs may need cleaning every one to two years, particularly in shaded areas. Care must be taken during cleaning, as tiles can crack under foot traffic or excessive pressure.

Cedar Shake

Cedar shake roofs are beautiful and common in older BC neighbourhoods, but they require the most maintenance. The organic nature of wood makes cedar shakes a magnet for moss, lichen, and algae. These roofs typically need cleaning every one to two years, along with treatments to preserve the wood and prevent decay. Without regular maintenance, cedar shakes can curl, split, and rot much faster than their expected lifespan.

BC Moss and Algae Factors

British Columbia’s climate is particularly challenging for roof maintenance. The Lower Mainland receives an average of 1,200mm of rain annually, combined with mild winter temperatures that rarely drop below freezing for extended periods. This creates year-round growing conditions for moss and algae, unlike colder provinces where winter kills off most organic growth.

Several local factors accelerate moss and algae growth on your roof:

  • Tree canopy – Overhanging branches create shade and deposit organic debris that feeds moss growth.
  • North-facing slopes – These sections receive minimal direct sunlight and stay damp longer after rainfall.
  • Proximity to forests or green spaces – Airborne spores from nearby wooded areas settle on your roof and establish colonies quickly.
  • Poor attic ventilation – Inadequate ventilation can cause condensation on the underside of the roof, adding moisture from below as well as above.

What Happens If You Skip Roof Cleaning

Neglecting roof cleaning does not just affect the appearance of your home. Over time, the consequences become increasingly serious and expensive:

  • Shortened roof lifespan – Moss and algae retain moisture that breaks down roofing materials. A roof rated for 25 years may only last 15 if not properly maintained.
  • Water damage and leaks – As moss lifts shingles and deteriorates sealant, water finds its way into the roof structure, damaging insulation, drywall, and framing.
  • Increased energy costs – A compromised roof loses insulating effectiveness, leading to higher heating bills during BC’s cooler months.
  • Pest infestations – Gaps created by lifted or damaged roofing materials can allow squirrels, birds, and insects to enter your attic.
  • Lower property value – A visibly mossy or stained roof signals deferred maintenance to potential buyers and can reduce your home’s market value.

Commercial Roof Cleaning Frequency

For commercial properties, the cleaning timeline will greatly depend on the location, the surrounding environment, and the building’s usage. Usually, a commercial roof may need professional cleaning every two to three years.

Determining Your Roof Cleaning Schedule

Several factors contribute to how frequently you should schedule a professional roof cleaning:

  • Local Flora: If your property has many trees, you may need to clean your roof more frequently. Fallen leaves, bird droppings, and sap can build up over time, fostering an environment for moss and algae to grow.
  • Climate Conditions: Homes in moist, shady areas are more susceptible to moss and algae growth, which could necessitate more regular roof cleaning.
  • Roof Material: Different roofing materials may require distinct care. Some materials may be more vulnerable to algae or moss growth than others, affecting your cleaning schedule.

FAQs

  1. Why is regular roof cleaning necessary?

Routine roof cleaning is integral to preventing the buildup of harmful organisms like moss or algae, which can damage your roof and shorten its lifespan.

  1. Can homeowners clean their roofs themselves?

While some basic cleaning tasks can be handled by homeowners, for a detailed, thorough cleaning, it is best to hire professionals. This ensures the cleaning is conducted safely and effectively.

  1. Where can I find professional roof cleaning services?

Shine City offers top-tier professional roof cleaning services in Surrey, British Columbia, and the surrounding areas. Our experienced team provides efficient and thorough roof cleaning, ensuring the longevity and aesthetic appeal of your roof.

In conclusion, a clean roof is not just pleasant to look at; it is also a vital part of your property’s upkeep. By maintaining a regular cleaning schedule based on your roof type and local conditions, you can enhance your roof’s lifespan and the overall health of your home. Contact Shine City today to schedule your next roof cleaning appointment.

How Much Does Regular Roof Cleaning Cost?

Understanding the cost of roof cleaning helps you budget for this essential maintenance task. In the Lower Mainland, typical roof cleaning prices are:

  • Small roof (under 1,000 sq ft): $250-$350
  • Standard roof (1,000-1,500 sq ft): $300-$450
  • Large roof (1,500-2,500 sq ft): $400-$550
  • Extra large roof (2,500+ sq ft): $550-$700+

When you consider that a premature roof replacement costs $10,000-$25,000, spending $300-$600 every two to three years on professional cleaning is one of the most cost-effective home maintenance investments you can make. Regular cleaning also maintains your home’s curb appeal and can prevent warranty issues with your roofing manufacturer, as many warranties require evidence of regular maintenance.

Signs Your Roof Needs Cleaning Now

Even if you follow a regular cleaning schedule, certain visual indicators suggest your roof needs attention sooner rather than later:

  • Dark streaks or staining — Black or dark brown streaks running down your roof are caused by a type of algae called Gloeocapsa magma. While not immediately damaging, these streaks indicate moisture retention that will eventually encourage moss growth.
  • Visible moss patches — Any green moss visible from ground level means the growth is already well-established. Thick moss that is visible from the street has likely been growing for several months and should be addressed promptly.
  • Lifted or curling shingles — Moss roots growing under shingle edges cause them to lift and curl. If you notice shingles that appear raised or uneven, moss is likely the culprit.
  • Granules in your gutters — Finding an unusual amount of shingle granules in your gutters during cleaning is a sign that your roof surface is deteriorating, potentially accelerated by moss or algae activity.
  • Debris accumulation in valleys — Roof valleys where two slopes meet tend to collect leaves, needles, and organic debris. This trapped material holds moisture and creates ideal conditions for moss to establish.

Roof Cleaning and Home Insurance in BC

Many BC homeowners are unaware that neglecting roof maintenance can affect their home insurance coverage. While insurance companies do not typically require proof of annual roof cleaning, claims related to water damage caused by a visibly neglected roof may be denied or reduced. If an adjuster determines that moss damage was the result of prolonged maintenance neglect, the claim could be classified as a maintenance issue rather than a covered peril. Maintaining a regular cleaning schedule and keeping receipts from professional services provides documentation that you have fulfilled your maintenance obligations.

Combining Roof Cleaning with Other Services

The most cost-effective approach to roof maintenance is bundling it with other exterior cleaning services. When a professional crew is already on-site with equipment set up, adding services takes less time than scheduling them separately. Common service combinations include:

  • Roof cleaning + gutter cleaning — The most natural pairing, since roof cleaning debris inevitably washes into gutters. Bundling typically saves 10-15%.
  • Roof cleaning + house washing — Cleaning your roof without washing the siding below means dirty runoff can stain your walls. Doing both at once ensures a uniformly clean exterior.
  • Full exterior package — Roof, gutters, house wash, and windows combined. This comprehensive approach saves the most money and gives your entire property a refreshed appearance in a single visit.

At Shine City, we encourage bundling and offer package discounts to make comprehensive maintenance more affordable. Contact us for a free estimate on any combination of services. Call (604) 229-5354 or request a quote online.

Regular roof cleaning is one of the most important maintenance tasks for BC homeowners. By understanding your roof type, monitoring for warning signs, and keeping to a consistent cleaning schedule, you can extend your roof’s lifespan by a decade or more and avoid the devastating costs of premature replacement. Whether you have asphalt shingles, cedar shakes, or tile, the investment in professional cleaning pays for itself many times over.

Categories
Pressure Washing Blog

How To Prevent Roof Moss

Moss may seem like a minor inconvenience, but left untreated, it can cause significant damage to your roof. In this article, we will discuss various strategies on how to prevent moss on your roof, from DIY methods to professional treatments, and help you build a long-term maintenance plan that protects your home from potential damages.

Updated for 2026 with the latest best practices, pricing insights, and expert tips for Vancouver-area homeowners.

How To Prevent Roof Moss

Understanding Moss and Its Impact

Moss thrives in cool, damp, and shady environments — specifically, areas of your roof that do not get much sun. While on the surface, moss may seem merely aesthetically displeasing, it can cause serious damage. It retains moisture, and over time, this can cause roof materials to deteriorate, resulting in expensive repairs or roof replacement.

In British Columbia, moss is more than an occasional nuisance — it is a near-constant threat. The Lower Mainland’s mild, wet winters create ideal growing conditions for moss spores, which can colonize a roof surface in a single season. Once established, moss acts like a sponge, holding water against your shingles or shakes and accelerating the breakdown of roofing materials from the outside in.

Why BC Homeowners Face More Moss

Not all climates create equal moss problems. Several factors specific to British Columbia make roof moss prevention especially important for local homeowners:

  • Persistent moisture – The Lower Mainland receives over 1,200mm of rain annually, with most of it concentrated between October and April. Roofs rarely dry out completely during these months.
  • Mild winter temperatures – Unlike the Canadian prairies, our winters rarely produce sustained freezing temperatures that would kill moss. The mild conditions allow moss to grow year-round.
  • Abundant tree canopy – Many neighbourhoods in Surrey, Langley, and Abbotsford are heavily treed, creating shade that blocks the sunlight moss cannot tolerate.
  • Airborne spores – Proximity to forests, parks, and green spaces means there is a constant supply of moss spores drifting onto roof surfaces.

Remove Favourable Moss Conditions

Limiting conditions that help moss thrive is the first step in preventing its growth. Moss loves shade, so trimming any overhanging branches to increase sunlight on the roof often deters moss growth. Additionally, keeping your roof clean and free of debris that could also harbour moisture also aids in moss prevention.

Proven Prevention Methods

Beyond removing shade and debris, there are several proactive steps you can take to prevent moss from taking hold on your roof:

Zinc or Copper Strips

Installing zinc or copper strips along the ridge line of your roof is one of the most effective long-term moss prevention methods. When it rains, trace amounts of metal wash down the roof surface, creating an environment that is toxic to moss and algae. Zinc strips are the more affordable option and are widely used in the Lower Mainland. Copper strips last longer and are slightly more effective but come at a higher cost. For best results, strips should run the full length of the ridge and be installed under the top row of shingles with a couple of centimetres exposed.

Tree Trimming

Overhanging branches are one of the biggest contributors to roof moss. They create shade, drop organic debris, and block airflow — all conditions moss needs to thrive. Trimming branches back at least two metres from the roofline allows more sunlight to reach the roof and improves air circulation. This single step can dramatically slow moss growth, particularly on south-facing and east-facing roof sections that would otherwise receive good sun exposure.

Chemical Treatments

Moss prevention treatments, often zinc sulphate-based solutions, can be applied to your roof after cleaning to inhibit regrowth. These treatments are most effective when applied in early fall before the wet season begins, giving the product time to bond to the roof surface. Professional-grade treatments typically last 12 to 18 months, while over-the-counter products from hardware stores may need reapplication more frequently.

Routine Roof Maintenance

Regular roof inspection and maintenance play a critical role in moss prevention. Look out for any early signs of moss growth, especially after seasons of heavy rainfall. Proactive steps can mean treating mossy patches before they spread across your roof.

Improve Air Circulation

Moss thrives in wet, stagnant environments. Therefore, improving air circulation around your roof is an effective prevention method. Trimming tree branches to create more open space around your roof allows better air circulation and reduces the roof’s moisture levels.

DIY vs. Professional Moss Prevention

When it comes to preventing roof moss, homeowners often wonder whether they should handle it themselves or hire a professional. Here is a straightforward comparison to help you decide:

DIY approaches work well for basic maintenance like keeping gutters clear, removing debris from the roof surface, and trimming nearby branches. You can also apply granular moss killer products available at garden centres. However, DIY work has limitations — climbing onto your roof carries real safety risks, and improper application of chemical treatments can damage shingles or harm surrounding plants.

Professional service is the better choice for thorough moss removal, soft wash treatments, and the installation of zinc strips. Professionals have the proper safety equipment for working at height, use commercial-grade products that last longer than retail options, and can identify early signs of roof damage that homeowners might miss. A professional cleaning and treatment once a year or every two years, combined with basic DIY maintenance between visits, is the most cost-effective strategy for most BC homeowners.

Long-Term Moss Prevention Plan

The most effective way to prevent roof moss is not a single action but an ongoing maintenance plan. Here is a practical schedule for Lower Mainland homeowners:

  • Every spring – Inspect your roof from the ground for visible moss or algae. Clear any debris that accumulated over winter. Trim back branches that have grown closer to the roofline.
  • Every fall – Schedule a professional roof cleaning and moss treatment before the rainy season begins. This is the most impactful single step you can take each year.
  • Every 5 to 7 years – Consider replacing zinc strips if they have worn thin. Have a professional assess the overall condition of your roofing material and recommend any repairs.
  • Year-round – Keep gutters clean so water drains properly. Standing water on any part of your roof system encourages moss growth.

Professional Moss Prevention

For the best results, hiring a professional moss removal service like Shine City is advised. Professionals provide expert services including proper roof cleaning, moss treatment, and preventive maintenance which saves homeowners from the hassle of DIY methods.

FAQs

  1. Why is it important to prevent moss on your roof?

Moss retention of moisture can erode roofing materials, leading to leaks and other structural problems. Regular inspection and professional cleaning are crucial steps in the moss prevention process.

  1. Can I prevent moss growth on my roof by myself?

While some preventive measures can be done by homeowners, for more thorough cleaning and maintenance, it is advisable to use a professional service like Shine City. They have the tools and expertise to handle moss prevention efficiently and effectively.

  1. Where can I find professional help for moss prevention?

Shine City offers professional moss prevention services in Surrey, British Columbia, and its surrounding areas. Our team of experts provides comprehensive services, ensuring your roof remains moss-free.

In conclusion, proactive measures and regular maintenance are key to keeping moss at bay. By understanding the conditions moss requires to grow, you can work to alter your roof’s environment accordingly. With the right combination of zinc strips, tree trimming, chemical treatments, and professional cleaning, you can keep your roof moss-free and in good health for decades. Contact Shine City today to discuss your roof maintenance needs.

Cost of Moss Prevention vs Moss Removal

One of the strongest arguments for investing in moss prevention is the cost comparison. Here is what typical homeowners in the Lower Mainland can expect to pay:

  • Zinc strip installation: $200-$500 (lasts 5-7 years)
  • Professional tree trimming: $200-$600 per session
  • Annual moss prevention treatment: $150-$300
  • Heavy moss removal (when prevention is neglected): $400-$700
  • Premature roof replacement due to moss damage: $10,000-$25,000

A homeowner who invests in zinc strips, keeps trees trimmed, and schedules preventive treatment every other year will spend roughly $200-$400 per year on moss prevention. A homeowner who ignores their roof until heavy moss removal is needed will spend $400-$700 every two to three years, plus face significantly higher risk of structural damage that could cost tens of thousands to repair.

Moss Prevention for Different Roof Types

Not all roofs respond to prevention methods the same way. Here is how to tailor your approach based on your roofing material:

Asphalt Shingles

Asphalt shingles are the most common roofing material in BC and respond well to all standard prevention methods. Zinc strips are particularly effective because the flat shingle surface allows rainwater to distribute the metal ions evenly. Chemical treatments adhere well to the granular surface and provide lasting protection.

Cedar Shakes

Cedar shake roofs are the most challenging to keep moss-free because the rough, organic surface provides excellent grip for moss roots. Zinc strips help but may not provide complete coverage on thick, irregular shakes. The best approach for cedar is a combination of zinc strips, aggressive tree trimming to maximize sun exposure, and annual professional treatment with a wood-safe moss inhibitor.

Metal Roofing

Metal roofs are naturally resistant to moss due to their smooth, non-porous surface. However, debris can accumulate in seams, around fasteners, and in valleys where moss finds enough material to take root. Prevention for metal roofs focuses on keeping the surface clear of debris and ensuring proper drainage. Zinc strips are generally not needed for metal roofs.

Concrete and Clay Tile

Tile roofs are porous and textured, making them highly susceptible to moss in BC’s climate. Prevention requires a combination of zinc strips, regular cleaning, and chemical treatment. The porous surface absorbs treatment solutions well, so professional-grade products tend to be particularly effective on tile. However, the fragile nature of tiles means prevention is even more important than removal, since walking on tile roofs to clean them risks cracking individual tiles.

Taking a proactive approach to moss prevention saves money, extends your roof’s lifespan, and keeps your home looking its best. Contact Shine City to discuss a moss prevention plan tailored to your roof type and neighbourhood. Call (604) 229-5354 or get a free quote online.

When Prevention Is Not Enough

Even with the best prevention plan, Vancouver’s climate means some moss growth is inevitable over time. When you notice moss beginning to establish, early treatment is far more effective and affordable than waiting until it becomes a thick blanket covering your roof. A light cleaning and retreatment at the first sign of regrowth costs significantly less than heavy moss removal and prevents the damage that occurs when moss is allowed to mature and embed its root system into your roofing material.

Categories
Pressure Washing Blog

How Often Should You Clean Gutters?

When maintaining your home or commercial property, an essential task to schedule is gutter cleaning. But, how often should you clean gutters? This article will discuss the recommended gutter cleaning frequency and its importance, providing valuable insights for maintaining the health of your property.

Updated for 2026 with the latest best practices, pricing insights, and expert tips for Vancouver-area homeowners.

How Often Should You Clean Gutters

The Importance of Regular Gutter Cleaning

Understanding the significance of regular gutter cleaning is key to appreciating why this task is indispensable. Gutters are an integral part of any property, directing water away from your foundation and preventing water damage. Regular cleaning not only ensures your gutters function effectively but also prolongs their lifespan by preventing rust and corrosion.

When gutters become clogged, water has nowhere to go. It spills over the sides and pools around your foundation, which can lead to basement flooding, soil erosion, and even cracks in your foundation walls. In winter, blocked gutters contribute to ice dams that can force water under your shingles and into your attic. The cost of repairing this kind of water damage far exceeds the cost of regular gutter maintenance.

Residential Gutter Cleaning Frequency

For the average residential property, it is generally recommended that gutters be cleaned twice a year, usually in late spring and late fall. However, this can vary based on the number of trees near your property, your geographical location, and local weather conditions.

For instance, if your home is surrounded by trees, especially pines, which shed all year round, you will need to clean your gutters more frequently to prevent clogging. Houses located in areas prone to storms and heavy rainfall also require more regular cleaning.

Factors That Affect Cleaning Frequency

Not every home needs the same gutter cleaning schedule. Several factors can increase or decrease how often you should clean gutters:

Nearby Trees and Vegetation

This is the single biggest factor. Deciduous trees like maples and oaks drop massive amounts of leaves each fall, while evergreens like cedar and pine shed needles year-round. If your property has mature trees overhanging the roofline, you may need three or even four cleanings per year. Homes with no nearby trees can sometimes get by with one thorough annual cleaning.

Climate and Rainfall

In the Lower Mainland of BC, our wet climate means gutters work overtime from October through April. Heavy rainfall pushes debris through the system faster and can compact sediment in downspouts. The combination of rain and mild winters also encourages moss and algae growth inside gutters, which adds another layer of buildup beyond just leaves and twigs.

Roof Type and Pitch

Steeper roofs tend to shed debris into gutters more quickly, which can lead to faster buildup. Flat or low-slope roofs may hold debris longer before it washes into the gutter system. Additionally, roofs with textured surfaces like cedar shakes or architectural shingles can trap granules and organic matter that eventually makes its way into your gutters.

Seasonal Gutter Cleaning Schedule for BC

For homeowners in Surrey, Langley, Abbotsford, and the surrounding Lower Mainland, here is a practical seasonal schedule:

  • Late spring (May to June) – Clean out seed pods, blossoms, and any debris that accumulated over the rainy winter months. This prepares your gutters for the drier summer season.
  • Late fall (November) – The most critical cleaning of the year. After the majority of leaves have fallen, clear everything out before the heavy winter rains arrive. This ensures your gutters can handle the high water volume from November through March.
  • Mid-winter check (January to February) – If you have many trees or noticed issues in the fall, a quick mid-winter inspection can catch any new blockages before they cause overflow problems during peak rainfall.

Warning Signs Your Gutters Need Cleaning Now

Regardless of your regular schedule, certain warning signs indicate your gutters need immediate attention:

  • Water overflowing during rainstorms, spilling over the sides of the gutter instead of flowing to the downspout.
  • Sagging gutters – When debris and standing water add weight, the gutter can pull away from the fascia board.
  • Plants growing in the gutter – If you can see weeds or seedlings sprouting from your gutter, there is enough soil-like debris to support plant life, and the blockage is severe.
  • Water stains or mildew on your exterior walls below the gutterline, indicating consistent overflow.
  • Birds or pests nesting in the gutters, which suggests debris has been sitting long enough to create a habitat.

If you notice any of these signs, do not wait for your next scheduled cleaning. Address the issue promptly to prevent costly water damage to your home.

Commercial Gutter Cleaning Frequency

Commercial properties usually necessitate more frequent gutter cleaning due to larger roof areas and often more extensive gutter systems. The recommended practice for commercial properties is to have them cleaned at least twice a year. Of course, individual factors such as the building’s size, location, and nearby foliage may necessitate an adjusted schedule.

Considerations for Gutter Cleaning Schedules

While these are general guidelines, it is vital to adapt them according to your particular circumstances. More frequent cleaning may be necessary depending on specific variables, such as your property’s surroundings or the type of trees next to your house.

Moreover, never overlook the importance of keeping an eye on your gutters throughout the year. Any signs of overflowing water, leaks, or sagging should prompt immediate cleaning regardless of the last service date.

FAQs

  1. Why is regular gutter cleaning important?

Regular gutter cleaning ensures the longevity of your gutters and protects your property from potential water damage. Regular maintenance prevents the buildup of debris, reducing the risk of leaks or blockages that can lead to costly repairs.

  1. How often should I schedule professional gutter cleaning?

Residential properties should have their gutters cleaned at least twice a year. However, commercial properties or residences with many nearby trees may need professional gutter cleaning more frequently.

  1. Where can I find professional gutter cleaning services?

Shine City offers specialized gutter cleaning services for both residential and commercial properties across Surrey, British Columbia, and surrounding areas. We ensure that your gutters are well-maintained and functional.

In conclusion, ensuring regular and professional gutter cleaning is a small but critical aspect of property maintenance. By keeping up with a regular cleaning schedule, you can preserve your gutters’ life and help protect your home or building from potential water damage. Contact us at Shine City to schedule your next gutter cleaning service today.

Gutter Cleaning Costs in the Lower Mainland

Professional gutter cleaning in Surrey, Vancouver, Langley, and the surrounding Lower Mainland typically costs between $100 and $300 depending on the size of your home and the condition of your gutters:

  • Single-storey home: $100-$175
  • Two-storey home: $150-$225
  • Three-storey or complex roofline: $200-$300+

When compared to the potential cost of water damage from neglected gutters — foundation repair ($5,000-$20,000), basement waterproofing ($3,000-$10,000), or fascia replacement ($1,000-$5,000) — regular gutter cleaning is one of the most affordable preventive maintenance tasks a homeowner can schedule.

What Is Included in Professional Gutter Cleaning?

A thorough professional gutter cleaning goes beyond simply scooping leaves out of the trough. At Shine City, our gutter cleaning service includes:

  1. Complete debris removal — All leaves, needles, twigs, moss, and compacted sediment are removed from every linear foot of gutter.
  2. Downspout flushing — Each downspout is flushed with water from top to bottom to verify it drains freely. If a blockage is found, we clear it using specialized tools.
  3. Underground drain check — If your downspouts connect to underground drain pipes, we verify that the connection is intact and water flows through the underground system as designed.
  4. Flow testing — After cleaning, we run water through the entire gutter system to confirm proper drainage and identify any low spots or areas where water pools.
  5. Visual inspection — We check for loose hangers, sagging sections, joint separations, rust spots, and any other damage that could affect performance.
  6. Cleanup — All debris is collected and removed from your property. We leave your yard as clean as we found it.

DIY Gutter Cleaning vs Professional Service

Some homeowners prefer to clean their own gutters to save money. While this is certainly possible for single-storey homes with easy access, there are several reasons to consider professional service:

  • Safety — Gutter cleaning requires climbing ladders, often on uneven ground, and reaching overhead while maintaining balance. Falls from ladders are a leading cause of home injury in Canada, and the risk increases significantly for two-storey homes where extension ladders are needed.
  • Thoroughness — Homeowners typically clean what they can see from the ladder but miss compacted sediment at the bottom of the trough and blockages inside downspouts. Professional crews flush the entire system and check underground connections.
  • Speed — A professional team with proper equipment can clean most homes in 30-60 minutes. The same job takes a homeowner 2-4 hours, including ladder setup, moving around the perimeter, and cleanup.
  • Damage detection — Professional cleaners spot early signs of gutter damage that homeowners often overlook, such as hairline cracks in joints, early-stage rust, and hanger screws pulling out of fascia board.

Gutter Guards: Do They Eliminate the Need for Cleaning?

Gutter guards reduce the frequency of cleaning needed but do not eliminate it entirely. Even the best micro-mesh guards allow fine debris, shingle granules, and pollen to pass through and accumulate over time. Guards are most beneficial for homes under heavy tree canopy where leaf volume would otherwise require three or four cleanings per year. With guards installed, you may be able to reduce this to once or twice per year.

It is worth noting that gutter guards can actually make professional cleaning more difficult when it is needed, since the guards must be lifted or removed to access the trough beneath. Some guard designs are easier to service than others, so if you are considering installation, discuss serviceability with the installer.

Bundling Gutter Cleaning with Other Services

The most cost-effective approach to gutter maintenance is combining it with other exterior cleaning services during the same visit. Popular combinations include:

  • Gutter cleaning + roof cleaning — Since roof debris washes into gutters, it makes sense to clean both at once. This is the most popular bundle.
  • Gutter cleaning + house washing — A clean house looks odd with dirty, overflowing gutters. Addressing both ensures a uniformly maintained exterior.
  • Gutter cleaning + window cleaning — Overflowing gutters splash dirty water onto windows below. Clean the gutters first, then the windows, for lasting results.

Bundling services with Shine City typically saves 10-15% compared to booking each service individually. Contact us for a free bundled estimate, or call (604) 229-5354.

Regular gutter cleaning is one of the simplest and most cost-effective ways to protect your home from water damage. By maintaining a twice-yearly schedule and combining gutter cleaning with other exterior maintenance services, you keep your entire property in excellent condition while saving money through bundled service pricing. Do not wait for overflow or water damage to remind you — schedule your next gutter cleaning today.